
This page isn't finished yet!
- Half of the bosses tips are missing.
Kingdom Hearts Birth by Sleep Walkthrough
Birth by Sleep is different from the other Kingdom Hearts, because you can play with three characters, each following a different path. You will need to complete all stories to truly finish the game.
I decided to follow the recommended order to play with them: Terra, then Ventus, then Aqua. Of course, you are free to choose a different order, even though the story might get confusing – or maybe less surprising at times, depending.
This is a full walkthrough, meaning you will also find treasures location and advice for boss fights. I played in Critical Mode while writing it, so some fights might be easier and require less stategy than this guide suggests.
If you want a basic walkthrough, I invite you to read the Birth by Sleep Speed Run guide instead (not yet available). On the contrary, the 100% completion guide will tell you everything you need to do and when.
This guide was made while playing the Final Mix version. A PSP guide will be redacted at a later date.
First game
After the cut scene, you will take control of Ventus. This is a classic tutorial. You can try out all characters in combat, and later, you will have to choose one to start the game.
Terra's path
Land of Departure
After another cut scene, you are thrown into a fight. You will receive a Maximum HP bonus and the Critical Impact Command Style.
When the next cut scene is over, you will unlock Ventus and Aqua's D-Links and the Land of Departure (Keyblade) Command Board.
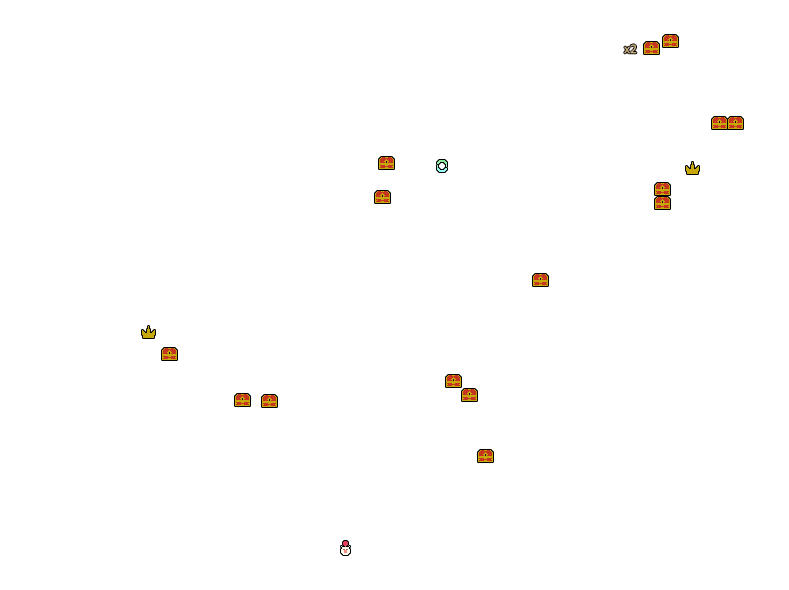
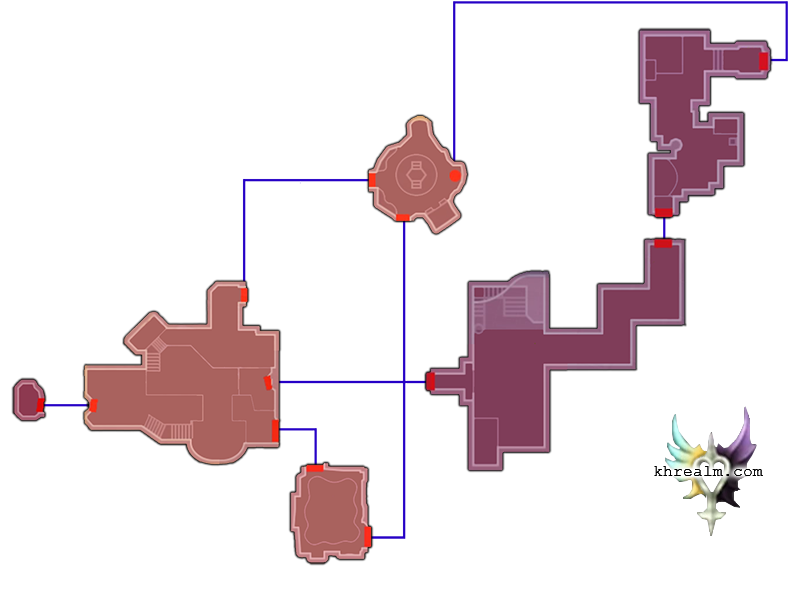
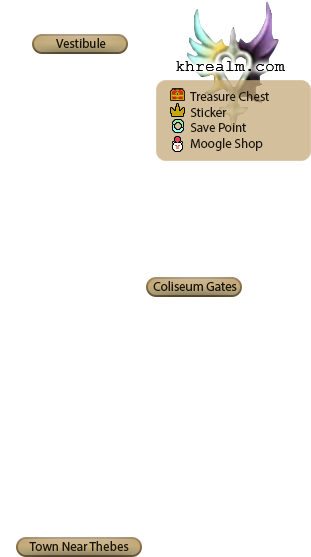
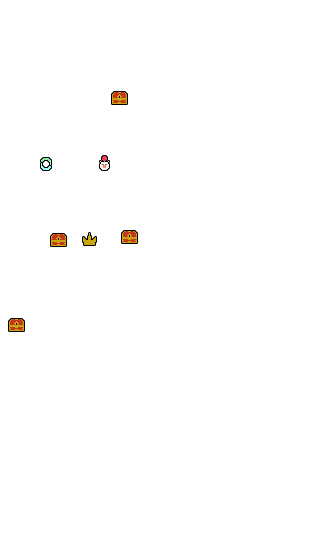
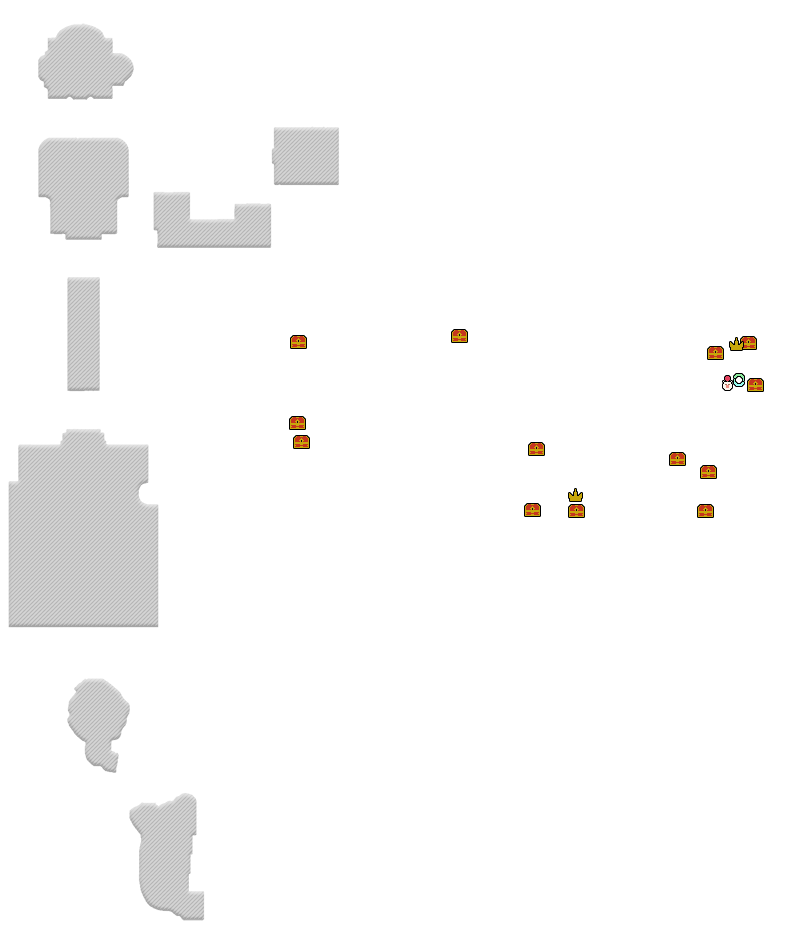
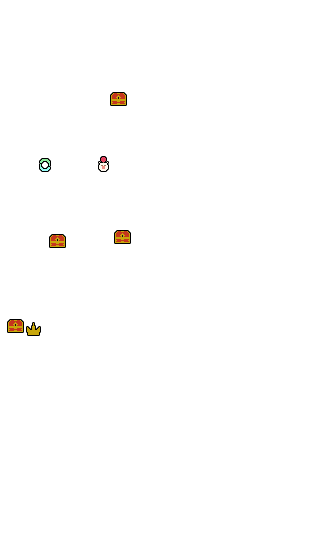
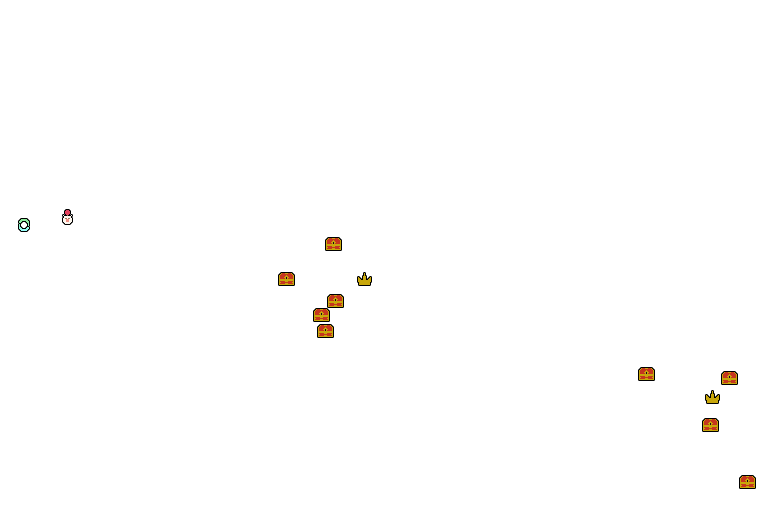
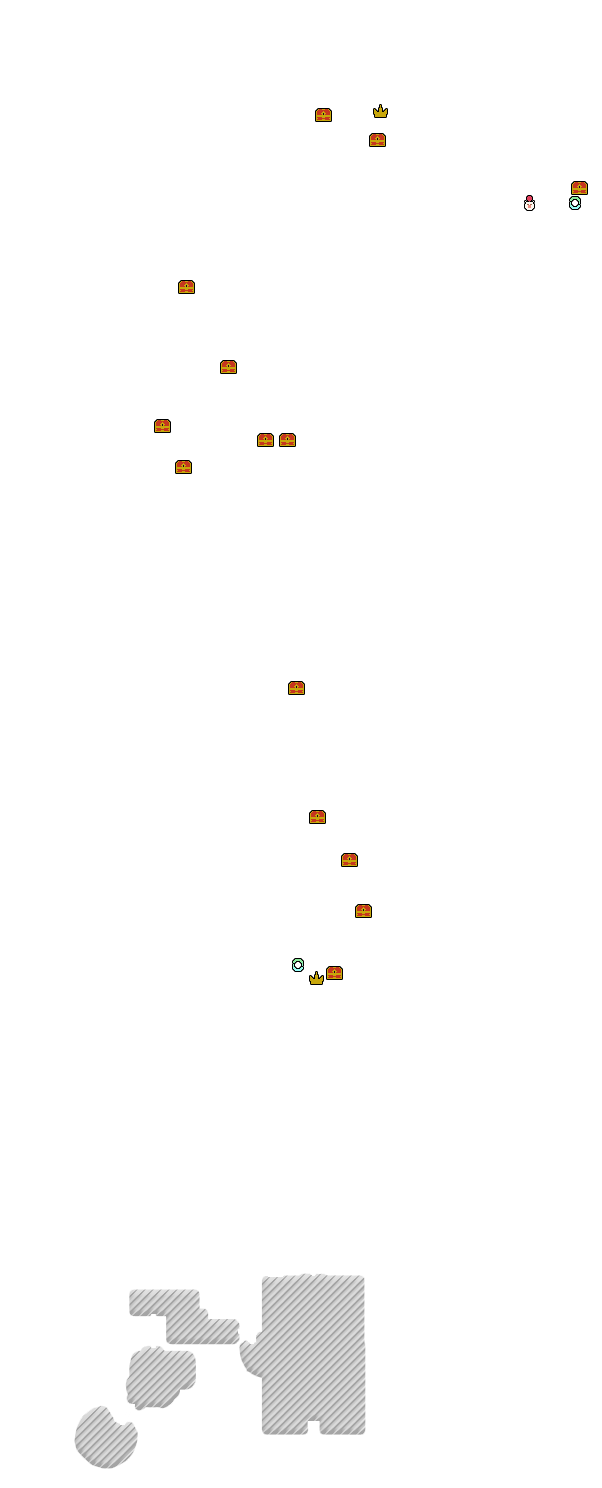
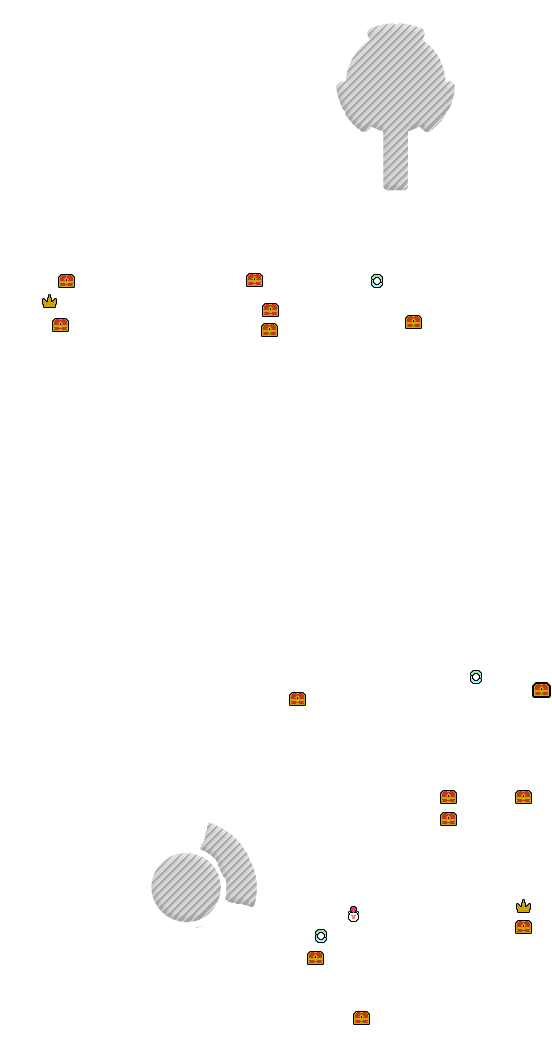
Enchanted Dominion

- #1: Potion
- #2: Pulsing Crystal
Search the area a bit to find the two chests and then go to the only available exit.
- #3: Blizzard
- Balloon Sticker
- Save Point
Follow the path. You will have to cross a long bridge and kill some Unversed on the way to the castle.
- #4: Zero Gravity
- #5: Ether
- #6: Potion
- Huey Sticker (not reachable)
Don't mind the sticker for now, as you can't reach it until you have specific abilities. Go up the stairs.
- #7: Ether
- #8: Map
- Save Point
- Moogle Shop
After a cut scene, you unlock Maleficent's D-Link.
- #9: Sleep
- #10: Attack Recipe
- Flying Balloon Sticker
Before turning back, you can go to the Tower Room to get a few treasures. Then, go back to where you came from, all the way to the Audience Chamber. Get ready for a boss fight.
While playing Kingdom Hearts, you will notice that learning bosses patterns is important, especially on higher difficulties.
The Wheel Master has three parts that you can target: himself, his wheel and his spindle. You can destroy the last two to make things easier.
- Wheel throw: when the boss spins his arm with the wheel, he will send it flying towards you. You can avoid or block it, but be careful as it moves around and can aim at you twice. Then, it will roll on the floor and stay there until the boss picks it up.
- Jump: the boss will jump on you, three times. If he just threw his wheel, the third jump will be on it instead of you. You can avoid by moving out of it, or jumping just as he reaches the ground.
- Punch: he will hit you with his arm if you get too close.
- Spindle: if his arm with the spindle is glowing, he will catch you with it. You can block it. If you don't, you will have to spam X to free yourself.
- Charge: when the boss loses enough HP, he will enrage for a while and charge at you. If you manage to block him, it'll stop him in his tracks.
When you hit the boss enough with combos, it will be stunned for a few seconds. Don't let this chance slip by!
You receive a Deck Slot, the Diamond Dust Command Style and the Fairy Stars Keyblade after the cut scene.
Land of Departure
You might as well get the treasures there now.
- #1: Pulsing Crystal
- #2: Hi-Potion
- #3: Stop
- #4: Soothing Crystal
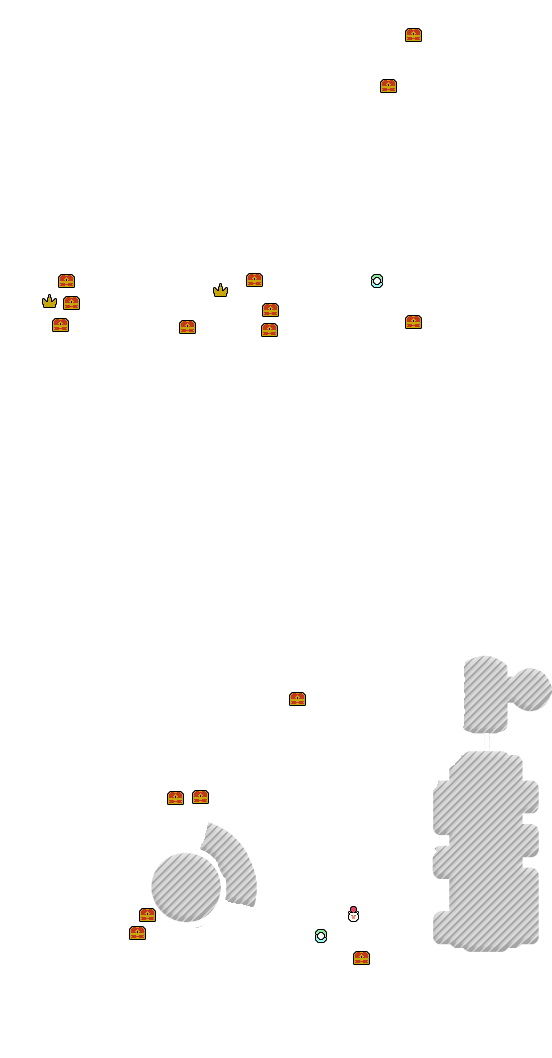
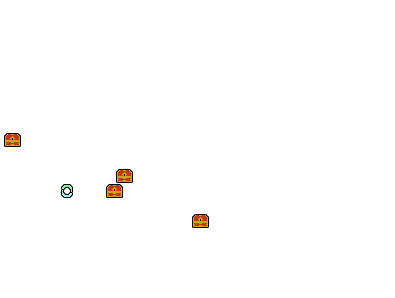
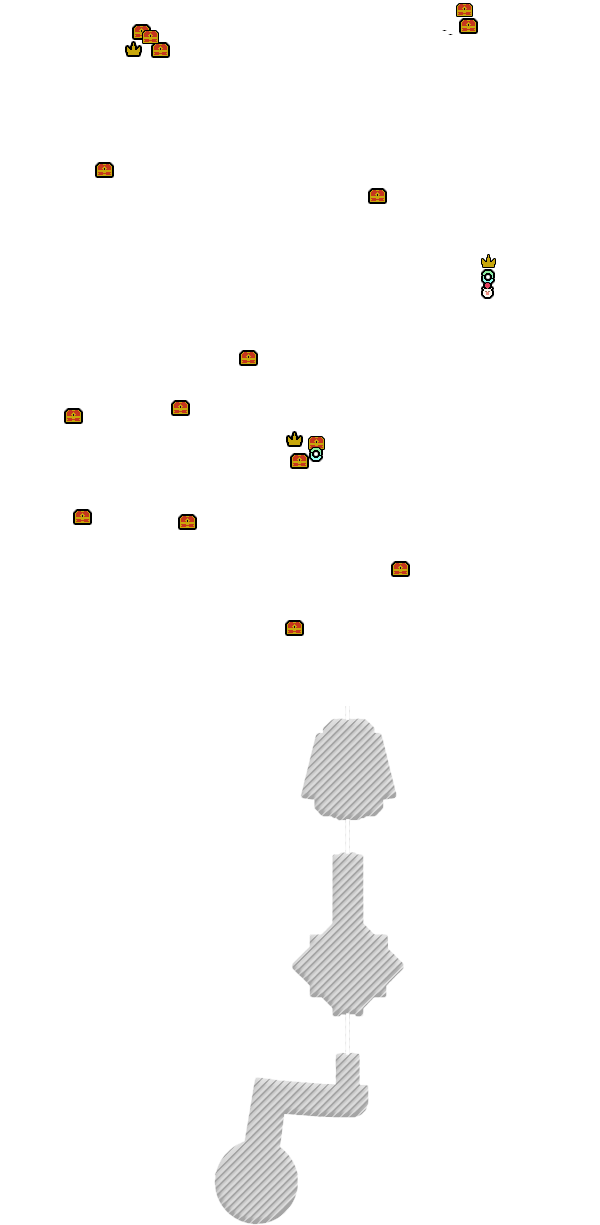
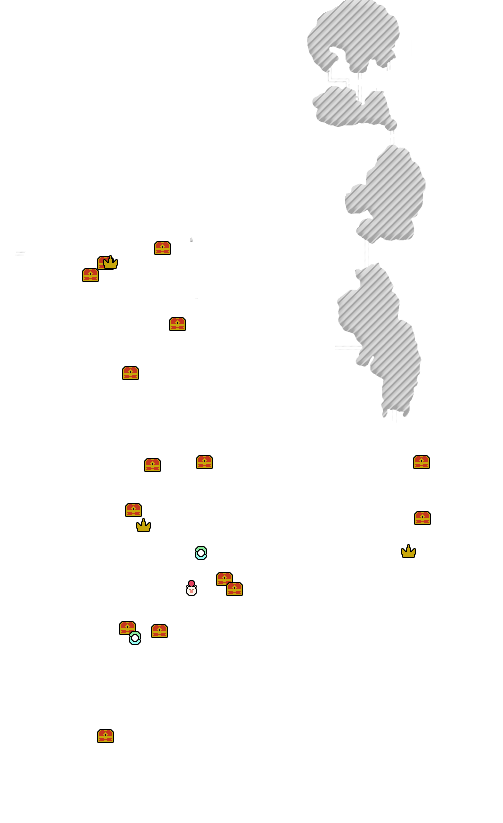
Castle of Dreams


You are thrown into a battle with Unversed upon arrival. After the fight, turn around and go to the next area to get a treasure and sticker.
- #1: Thunderstorm
- Traffic Cone Sticker
- Save Point
Go back when you are done and this time, head towards the castle.
- #2: Pulsing Crystal
- #3: Wellspring Crystal (after you come back)
- #4: Slow
- #5: Map
In the water, you might find special enemies that drop ice cream ingredients. You can't use them yet, but if you are a completionist, you might as well start gathering them now! The Unversed will despawn at some point, so you need to be fast. Every time they receive damage, they drop an item. It's best to hit them weakly but fast to get more items.
Go up the stairs to continue the story.
You will fight a lot of Unversed while Cinderella walks on her own. In the corridor, stay close to her, because some monsters will spawn behind her. In the next room, though, once you have beaten the first wave, you can go on ahead a bit, as long as you don't go too far away. You receive the Counter Hammer command as a reward. You can equip it now under the Block command.
- #7: Strike Raid
- #8: Potion
- #9: Hi-Potion
- #10: Soothing Crystal
After the cut scene, go down the stairs, then on your left.
- Flying Balloon Sticker (not reachable)
You need High Jump for the sticker.
- #11: Thunder
- Save Point
- Moogle Shop
Head to the Balroom and get ready for the boss fight.
- #6: Fleeting Crystal
This boss has four parts: himself, and three instruments. He's kind of slow, so you shouldn't have any trouble reacting to his attacks.
- Drum: when the drum lands, it will charge you. You can block it.
- Violin: the violin sends a ribbon-like range attack that you can also block.
- Trumpet: this instrument sends sound waves from afar. They're also blockable.
- Trio: the three instruments gather around you. After a short time, they will damage anything in the middle, so you can just Slide to avoid it.
- Spinning instruments: don't get too close while they are spinning around him as you might get hit.
- Jump: pretty much like the Wheel Master, you can either jump or Slide outside of range.
- Baton spin: the boss uses his conductor's baton like a boomerang and throws it at you. Can be blocked.
- Needles: fan attack in front of the boss, as he sends a few needles towards you.
If you hit the maestro enough, it will fall for a short while. As for the previous boss, take this opportunity to use your commands!
Stop and Poison both work on the instruments.
After the fight and the cut scene, you receive Cinderella's D-Link, the Stroke of Midnight Keyblade and unlock the Castle of Dreams (Royal) Command Board.
Don't forget to come back for the chest in the Palace Courtyard if you want, or wait until you have High Jump for the sticker (in a while).
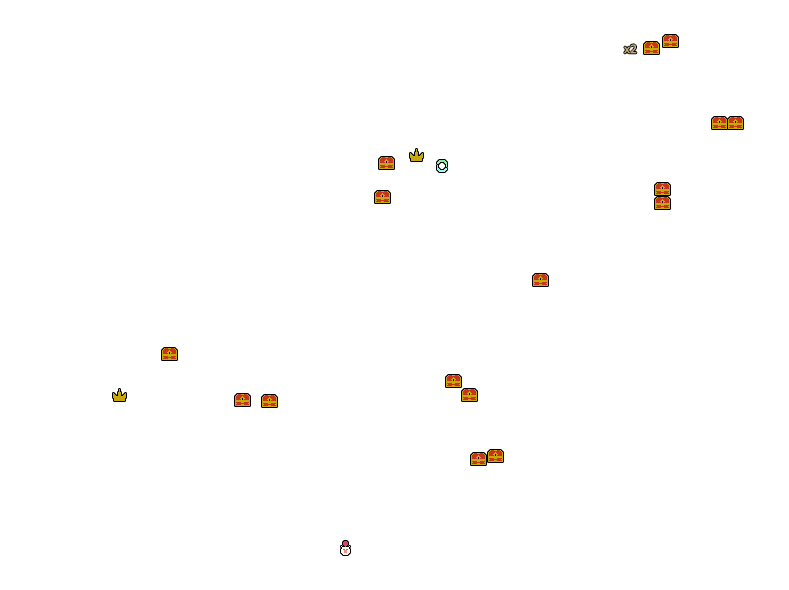
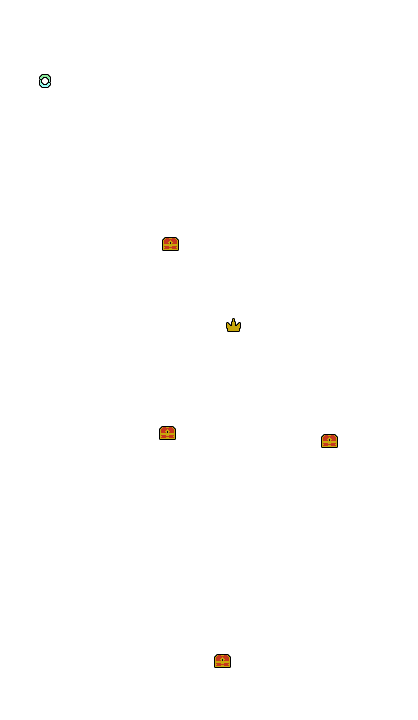
Dwarf Woodlands
- Save Point
After the cut scene, you can save your game and leave the room.
- #1: Balloon Letter
- #2: Ether
- #3: Potion
- #4: Flame Salvo
There are several treasures in this room. Two big chests are actually Spiderchests, be careful when you open them.
On your right, you will see green bubbles; jump on them and they will push you upwards. There is another device towards the exit, and you have to use a fire command on it to activate it. Use the first one to exit the area.
- #5: Potion
- #6: Block Recipe
- #7: Poison Edge
- #8: Fire
- Louie Sticker (not reachable)
You just have to follow the wall on your right to reach the next area, but treasures take time to get.
There is a wheel in front of you: hit it to open a metal gate, but only for a few seconds. It's located opposite the wheel. You will find a chest here and another wheel, which open two other gates. Jump down, get the first chest, and by the time you are done, you will have to do it again to reach the second gate, with two other chests. Unversed dropping ice cream ingredients might also spawn there.
You can't reach the sticker near the first wheel until you have a maxed out Air Slide.
- #9: Fission Firaga (not reachable)
- #10: Potion
- #11: Map
- #12: Soothing Crystal
- Save Point
- Moogle Shop
One of the chests isn't reachable yet, as you need Air Slide for it.
- #13: Hungry Crystal
- Balloon Sticker
After a cut scene, you will have to fight several waves of Unversed. You obtain Air Slide. Get the two treasures of this area, then go back to the Courtyard and climb on the arch by grabbing the wall on the left, then Air Slide to reach the chest. Then, go back to the Mirror Chamber.
This boss will often make replicas of himself. You have to attack the real one to make the others disappear. Look at his face: he's the only one smiling.
- Guard of honor: two never-ending lines of masks throw fireballs at you. Run until you find the smiling one and attack him.
- Circle: masks surround you and throw fireballs. Again, find the smiling one.
- Sidestep: the boss charges you in zigzag.
- Fireballs from above: the boss flies above you and spits fireballs down on you.
After the fight and the cut scene, you obtain a Maximum HP Bonus, the Firestorm Command Style and the Treasure Trove Keyblade.
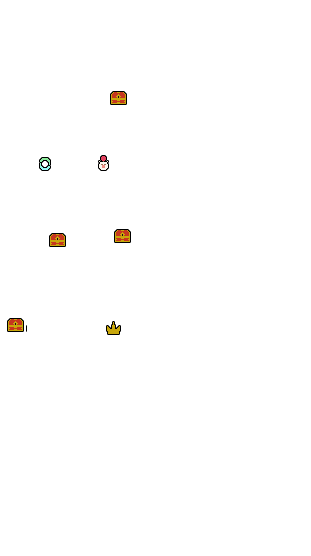
The Mysterious Tower
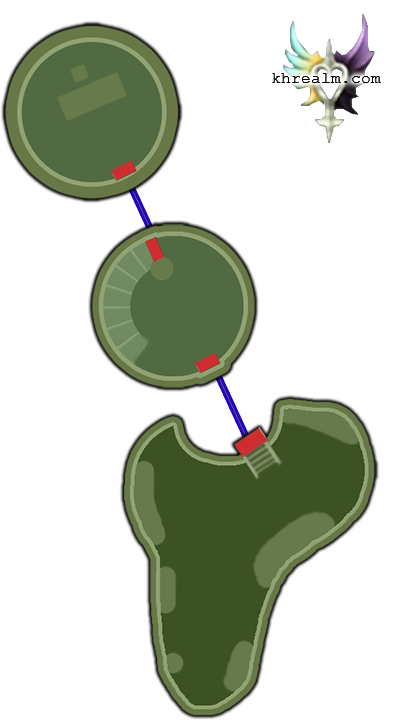
- #1: Pulsing Crystal
- #2: Balloon Letter
- #3: Cure
- #4: Magic Recipe
- Balloon Sticker (not reachable)
Before going inside, open the three chests in the area. In the tower, you will find another chest. You can then go up the stairs for a cut scene. You will need to come back with High Jump for the sticker in the Chamber.
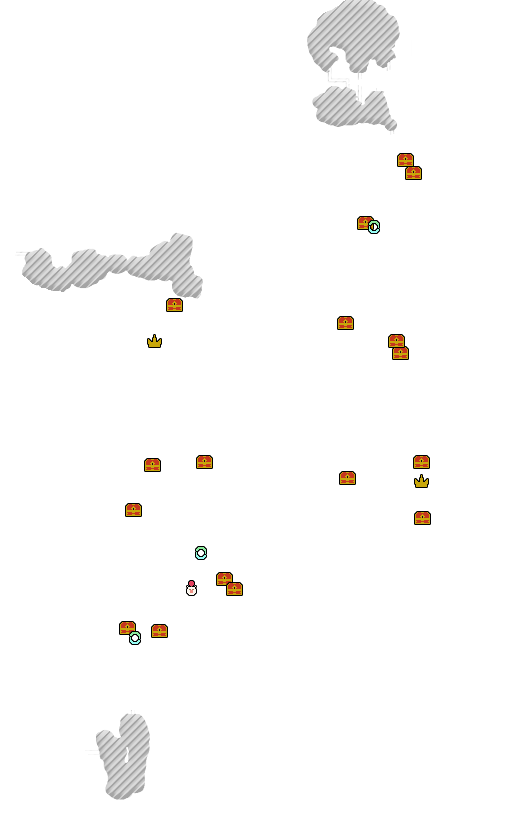
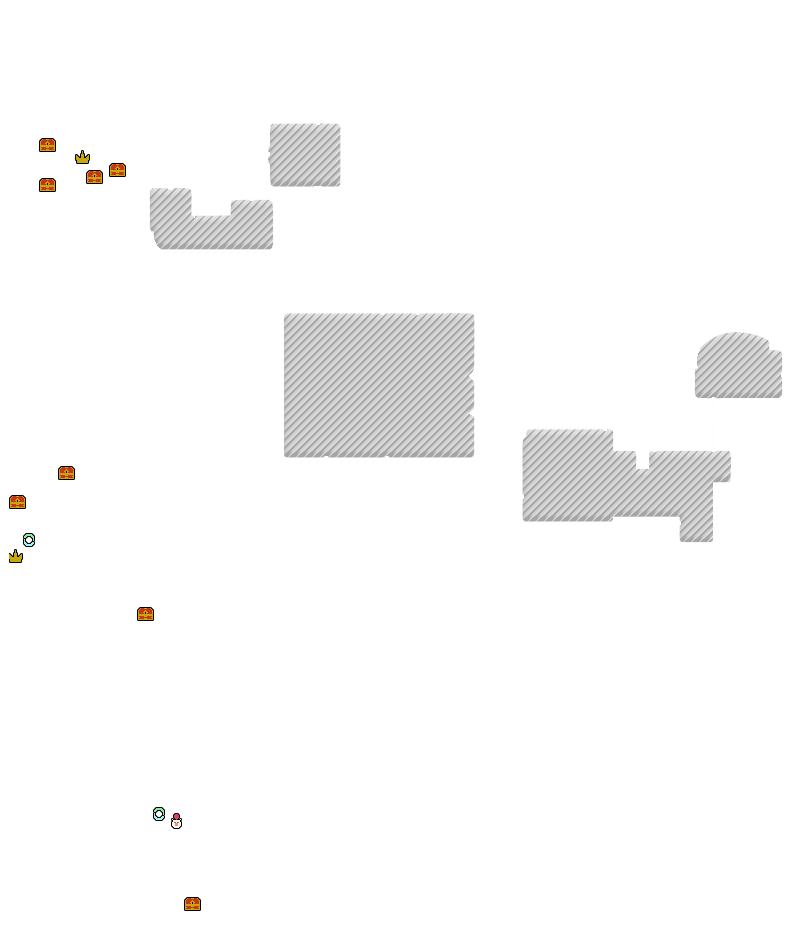
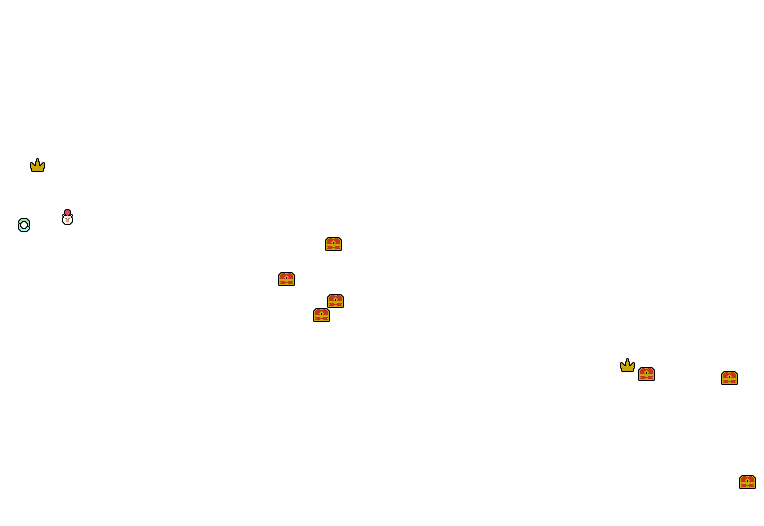
Radiant Garden
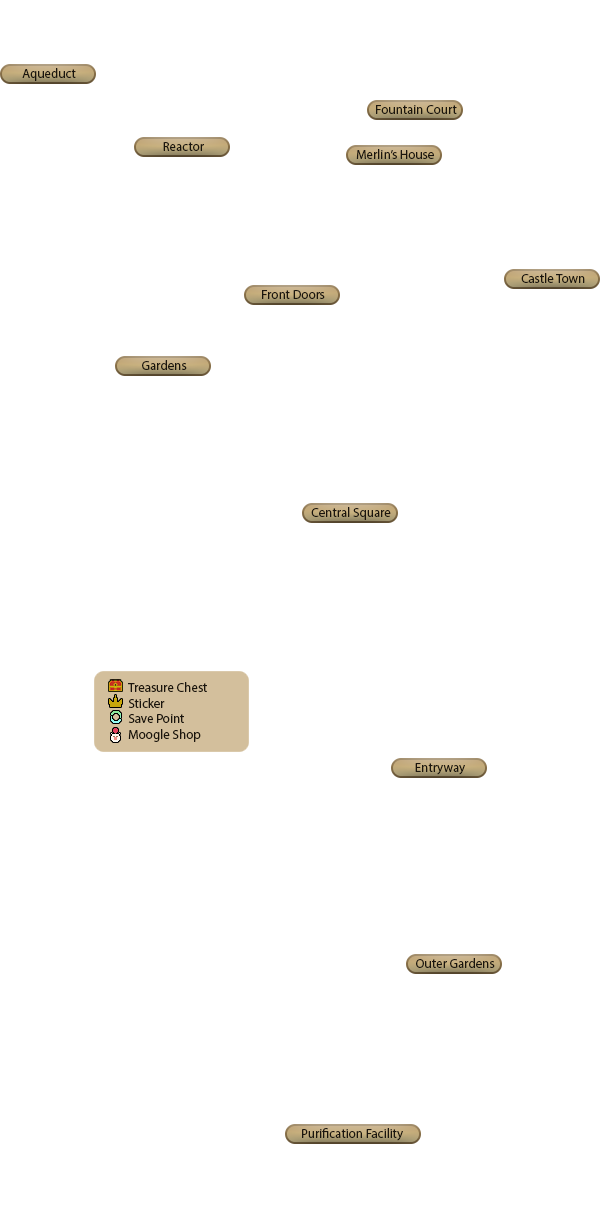

- #3: Potion
- #4: Hi-Potion
- Flying Balloon Sticker (not reachable)
As always, you have to fight Unversed when you land. Open the chests and go to the next area.
- #8: Map
- Save Point
- Moogle Shop
After the cut scene, enter Merlin's House.
- #12: Shimmering Crystal
Check the book to unlock The 100 Acre Woods (Honey Pot) Command Board.
- #9: Panacea
- #10: Thunder Surge
- #11: Fleeting Crystal
- Sticker Dale (not reachable)
In this area, you need to jump on the water jet to get higher and use your Air Slide to reach other platforms more easily. You will have to wait until you have Sonic Impact to reach the sticker.
- #5: Esuna
- #6: Blackout
- #7: Hi-Potion
Avoid walking in the water until you reach the Unversed that throw wind blades at you. When you get close enough, they stop their range attacks.
You won't be alone for this fight. Here are the boss' moves and how to avoid taking damage:
- Charge: it will surround itself with fire and charge towards you. It can be blocked.
- Fireballs: several fireballs are launched and drop around the boss. More will crawl towards the sides of the arena.
- Laser: when the boss becomes dark red, it will use a big laser. With Terra, you will have to stay behind and move with the boss. Be careful, it changes direction twice! However, if the feet have been destroyed at that point, you can just stay under the boss to be safe.
- Spinning attack: when the three parts are separated, they can spin around the arena, all at the same time. Staying in a corner and getting ready to guard is usually safe.
- Trample: the feet, when separated from the other parts, will trample the ground a few times. Can be guarded, or you can just avoid them.
- Lasers shower: short white lasers will be shoot around the whole arena. You can guard them if you face the boss properly.
- Duo/Trio laser: when separated, all parts still alive can link themselves with a laser and rotate a few times. Just don't stand in the middle and be careful when attacking them.
You get a Maximum HP Bonus and the Rockbreaker Command Style. After the fight, go back all the way to Central Square and go down the stairs.
- #1: Fira
- #2: Pulsing Crystal
- Airplane Sticker (not reachable)
You need High Jump for the sticker. Check the door in the middle of the area to access the Purification Facility.
- #13: Mega-Potion
- #14: Chaos Crystal
Get ready for another boss fight.
The fight begins with a long-range camera. Get ready to guard to send back the attack, and the camera will return to its usual position.
This fight is mostly about guarding, as you can reflect most attacks this way. Here are his moves:
- Normal shot: shoots several bullets at the same time; can be guarded.
- Double shot: teleports in the air and shoots four times with each gun; can be guarded.
- Circle shot: teleports close to you and shoots in a circle around you; you can guard this by spamming until it's over, or you can Slide away a few times.
- Target: long-range camera and he aims at you, exactly like the start of the fight.
- Dark ball: charges a dark ball, avoid this!
After the fight, you receive the Dark Volley Shotlock and the Xehanort's Report 2. Come back after the cut scene to get the treasures in this area.
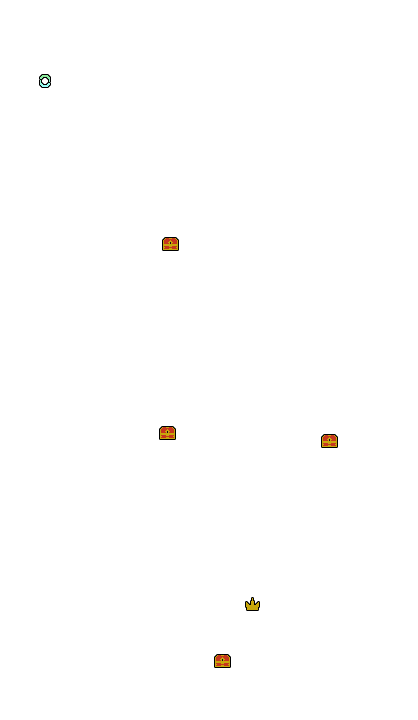
Disney Town

- #3: Abounding Crystal
- #4: Payback Fang
- #5: Slot Edge (via Pete's Room)
- Traffic Cone Sticker (not reachable)
After the cut scene, you can play the Rumble Racing mini-game. You can win it by using the shortcut each turn. You receive a Hi-Potion, unlock the race in the Mirage Arena as well as the Disney Town (Toon) Command Board.
You can come back after the race to get this world treasure chests.
- #1: Map
- #2: Potion
You can play the Ice Cream Beat mini-game in this area.
- #6: Panacea
- #7: Action Recipe
- #8: Chaos Crystal
- #9: Thunder
- #10: Thunder
- #11: Absolute Zero
- #12: Mega-Potion
- Pete's Sticker
Use several Thunder-based attacks on the electric meter to activate the area machinery.
Jump on the Mickey-shaped cog and you will find two chests. Use the other cog and you will have a choice: left or right.
On the right, you will have to jump on four mechanical hands to reach a chest (Air Sliding from the last one to the platform is easier).
On the left, there are two hands and cylinders. Jump on them then Air Slide to reach a chest and the entrance to the next area. You can also reach the sticker with Air Slide.
- #13: Zero Gravira
- #14: Aerial Slam
- #15: Break Time
- #16: Chaos Crystal
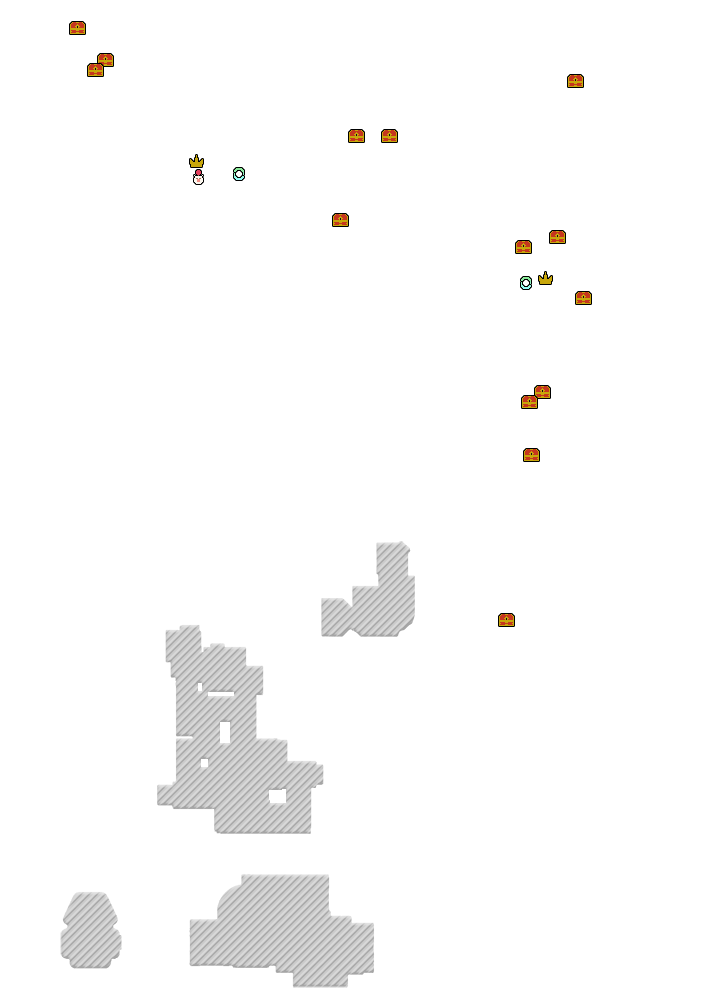
This room is a bit special. You will have to be a pinball ball to reach chests and another area. The gate at the center will open after your hit enough bumpers. Look at the picture below for more information.

You can reach the exit to the Raceway in the middle of the pinball machine. From there, you will be able to reach the sticker on the platform you can see from the roof, when you have Sonic Impact.
Olympus Coliseum
Be prepared to fight some Unversed when you land.
- #1: Fire Strike
- #2: Mega Attack Recipe
- #3: Mega-Potion
- Balloon Sticker(not reachable)
You need High Jump to reach the sticker.
- #4: Map
You have to win the games by defeating Unversed waves, then the boss (in two phases).
Zack is skilled with his sword, but this isn't the hardest part of the fight.
- Three hits: a basic attack than can be blocked.
- Up and down: he jumps then hits while coming down.
- Dark line: when he raises his sword, he sends a line of darkness towards you. Can be blocked or avoided.
After a cut scene, you will have to fight again, and this time, Zack has new abilities in addition to the ones above.
- Dark Omnislash: when he raises his sword while being surrounded by darkness, get ready for his most powerful move. This is pretty hard to avoid and I would recommend getting Once More for it. You can also aim a Shotlock while he's charging his attack and release it right away. If you have a sufficient level with your command, it should last long enough for you to not get hurt at all.
- Meteor: he calls forth meteors that aim at you. You can just Slide away to avoid them.
You receive the Sonic Impact command, the Mark of a Hero Keyblade and forge a D-Link with Zack.
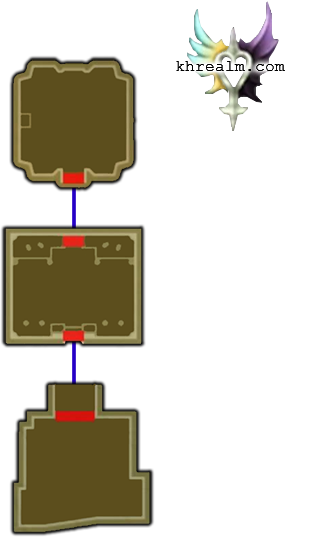
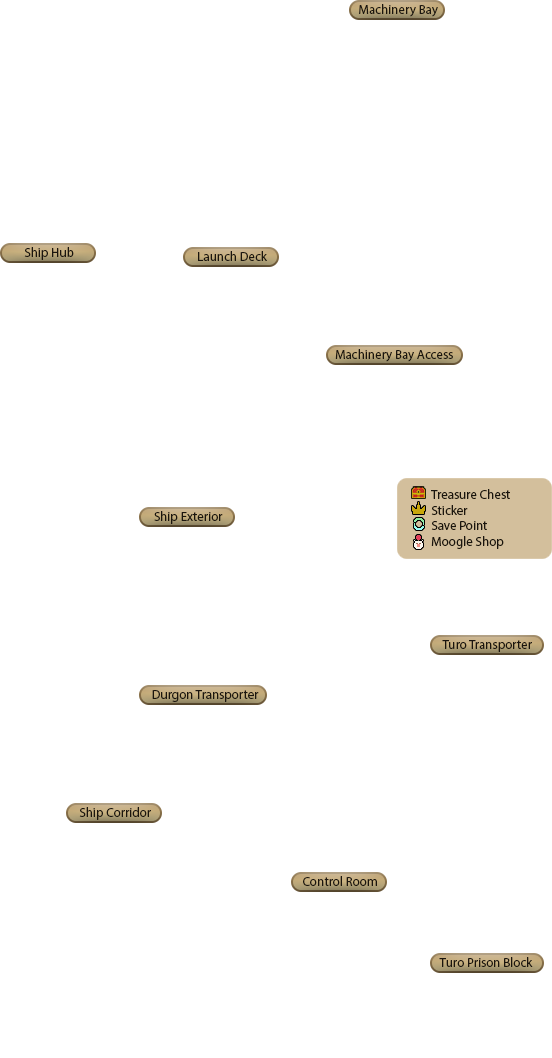
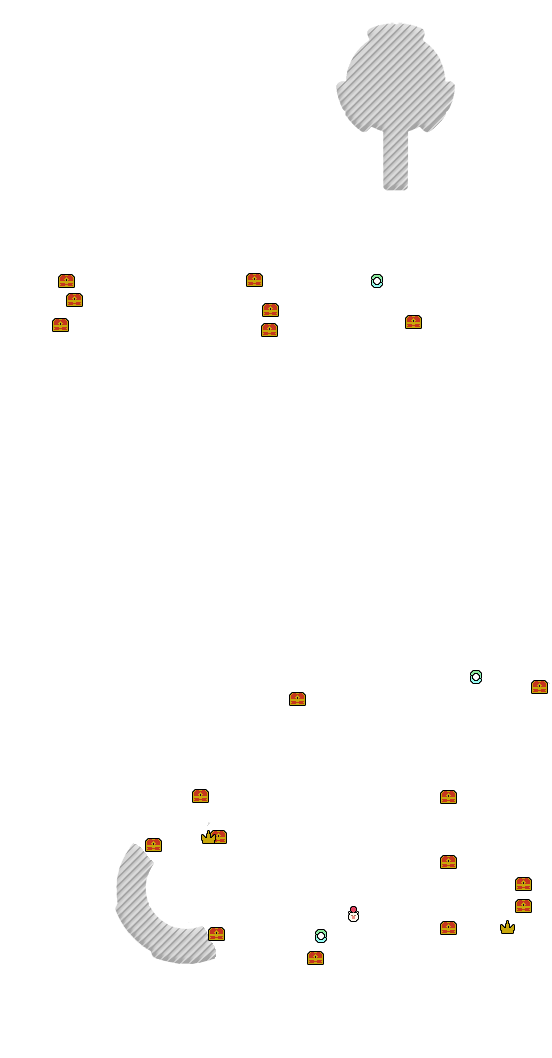
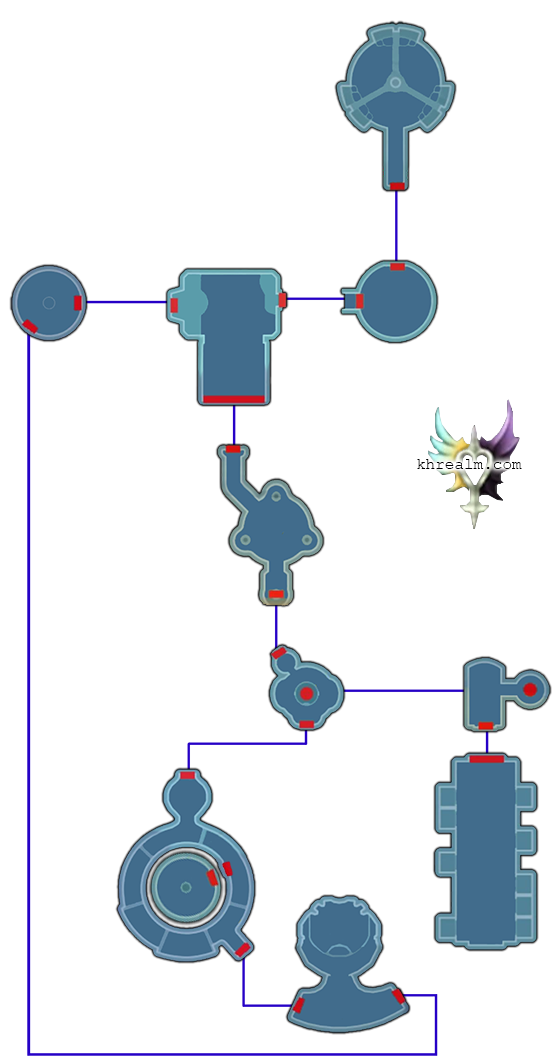
Deep Space
- #1: High Jump
- #2: Brutal Blast
- #3: Pulsing Crystal
- #4: Mega-Ether
- #5: Mega-Potion
- Flying Balloon Sticker
Before reaching this world, you will have to defend yourself against Unversed while traveling on your Keyblade. You receive a Maximum HP Bonus at the end of the fight.
In the first area, use the elevators and Air Slide to get every treasure. The highest cell on one side can be reached with a High Jump (that you receive in this room) and Air Slide from the highest cell of the other side.
- #6: Map
- Save Point
- #7: Hi-Potion
- #16: Thundara
- #17: Abounding Crystal
- #18: Wellspring Crystal
Use the computer to turn on/off the gravity and be able to jump higher. However, you can't reach the door to the Machinery Bay Access if the gravity is turned off, so you might want to go there first, to save some time.
- #19: Mine Square
- Save Point
- #13: Hungry Crystal
- #14: Mega-Potion
- #15: Fleeting Crystal
- #12: Hi-Potion
- Save Point
- Moogle Shop
- #8: Ether
- #9: Hi-Potion
- #10: Pulsing Crystal
- #11: Warp
- UFO Sticker
You will have to come back after the boss fight to get two of the chests, as a door leading to them will open.
This boss likes to fly around the field, so range attacks might be a good idea.
- Electricity balls: the boss stands in the center and release 4 or 6 balls. They will go towards the walls in a line but some will head for you. You can block or avoid.
- Giant ball: he will throw a huge ball of lightning at you. Avoid it.
- Rush: he will rush at you 2 to 3 times. You can block or avoid.
- Discharge: he will discharge electricity all around him, forming a dome. Don't stay close to him!
- Weaponry: he will take control of the mechanical arms/guns near the center of the room, and shoot at you 5 times with each one, several times, until they overload or you destroy them. You can block or run around to avoid the shots.
Ignite works pretty well for this fight, like with most bosses.
You forge a D-Link with Experiment 626 and receive the Hyperdrive Keyblade. The Deep Space (Spaceship) Command Board is also unlocked. As a side note, you can also unlock Pete's D-Link by playing this new board!
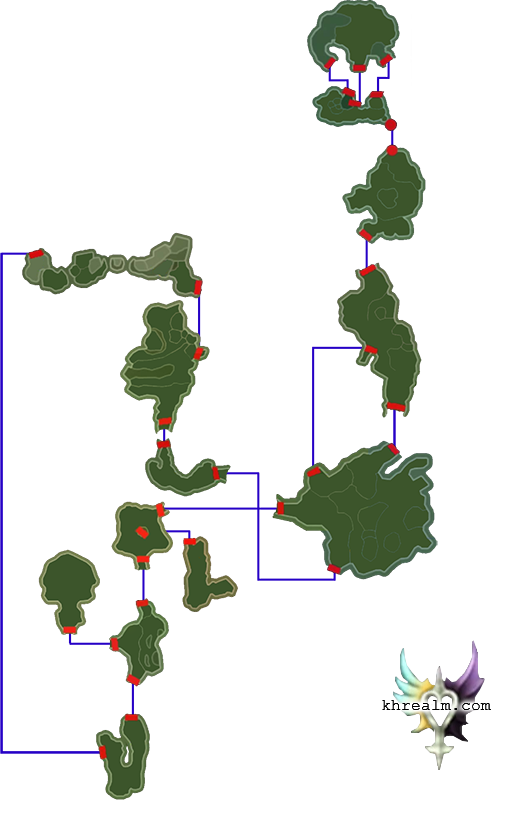
Never Land
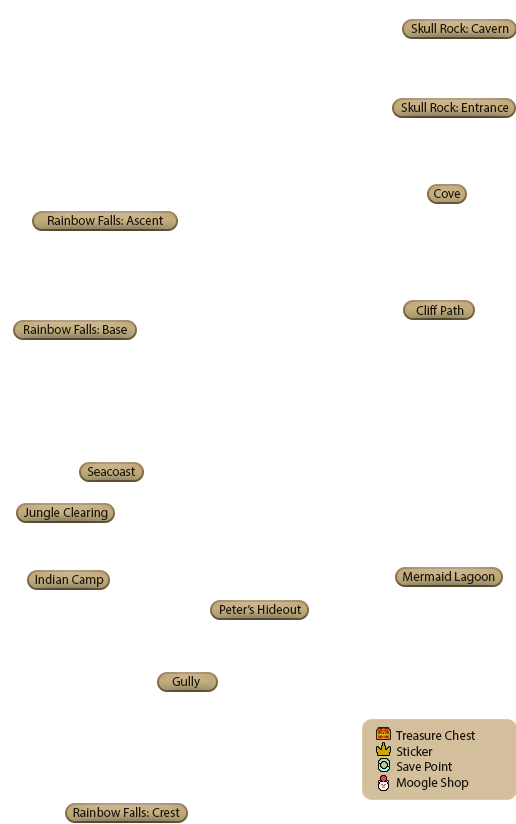
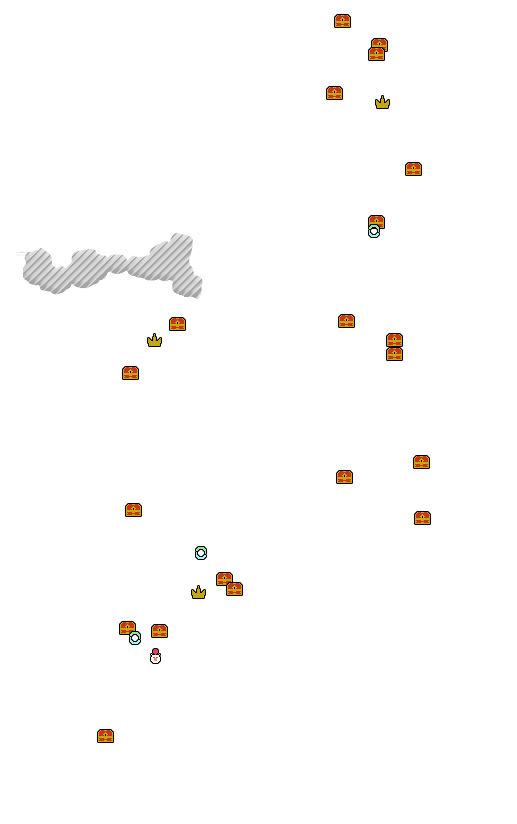
- #16: Abounding Crystal
As always, you are 'warmly' welcomed by Unversed when landing.
- #12: Map
- #13: Hi-Potion
- Save Point
- Moogle Shop
- #9: Hi-Potion
- #6: Dark Haze
- #7: Geo Impact
- #8: Elixir
One of the chests is a bit hidden: swim inside the small cave near the north-east exit.
- #3: Hi-Potion
- #4: Mega-Potion
- #5: Firaga
The big rocks can be broken by hitting them with a combo, or baiting a cannonball on them. You can also High Jump and Air Slide to reach a palm tree, which allows you to reach the highest chest in the Lagoon.
- #1: Hi-Potion
- #2: Ether
- Save Point
- #17: Panacea
- Chip Sticker
On the west side of the map, there are high platforms leading inside the Cavern. The other platform inside will lead you to the east exit and the sticker, as well as the special Unversed that drop ice cream ingredients, if you're lucky.
- #18: Megalixir
- #19: Ars Solumn
- #20: Chaos Crystal
If you entered through the hidden entrance on the west side, you can reach the other platform by using High Jump, then double Air Slide + Sonic Impact.
This boss will fly around the field most of the time, making it difficult to touch him without range attacks. He only has one simple attack: when he's flying and his hands start glowing, he will descend towards you and attack. There is really not much to this fight, and you only need to remove half of his life to win.
You receive the Blade Charge Command Style, and forge a D-Link with Peter Pan.
After the cut scene, go back inside the Cavern to fight some more. You are surrounded by flying Unversed. Defeat them to receive the Pixie Petal Keyblade as well as the Never Land (Skull) Command Board.
After another cut scene, you receive a second Keyblade: Ends of the Earth. You can go back to Never Land to visit the remaining areas and get a few more treasures.
- #10: Shimmering Crystal
- #11: Mega Magic Recipe
- Dewey Sticker
- #14: Megalixir
- #15: Zero Graviga
- Rainbow Sticker
You need to High Jump then Air Slide + Sonic Impact to reach the sticker.
Badlands
After a cut scene, you receive the Dark Impulse Command Style.
Land of Departure
This boss excels at parrying your attacks, physical or magical.
- Balls of light ("Prepare yourself!"): he launches 3 balls of light towards you. You can block to send them back to him, or avoid them.
- Blades of light ("Let the Darkness die!"): blades start spinning around him, hurting you if you say too close. Then, he will send them flying towards you. They might hit you from behind so it's better to stay close to a wall to avoid that as much as possible. You can block them to send them back, or run around to avoid them.
- Rush: he yells each time he rushes at you. He will do so 3 times in a row, and repeat this move if you don't block + counter him.
- Teleport: usually used right after a special attack like the balls/blades of light, he will teleport right next to you and hit you once. You can block him.
- Pillars of fire ("Prepare yourself!" when the screen goes dark): he will create 3 pillars of fire that all follow you. You can Slide to avoid them, but try to bait them in the same spot to make things easier.
- Lasers ("Let the Darkness die!" when the screen goes dark): he will create several lasers and make them rotate a bit. Stand in front of him but close to the wall so you don't get hit right away, and just jump then walk to avoid the attack.
- Combo: pretty similar to Terra's Ars Solum without the additional hits at the end of it. You can block it or just stay far away.
You get a Maximum HP Bonus at the end of the fight, as well as the Chaos Ripper Keyblade and Xehanort's Report 8.
Now might be a good time to visit all the worlds again to get the stickers you couldn't reach previously. If you followed this guide, you should need the following ones:
- Enchanted Dominion (Audience Chamber): High Jump then Air Slide + Sonic Impact from the stairs.
- Dwarf Woodlands (Waterway): High Jump then Air Slide + Sonic Impact after opening the first gate.
- Castle of Dreams (Passage): High Jump.
- Mysterious Tower (Sorcerer's Chamber): High Jump.
- Radiant Garden (Outer Garden): High Jump, (Central Square): High Jump, (Fountain Court): High Jump then Air Slide + Sonic Impact.
- Disney Town (Raceway): from Pete's Room, you need to High Jump then double Air Slide and Sonic Impact.
- Olympus Coliseum (Coliseum Gates): High Jump, it's behind a pillar.
Keyblade Graveyard
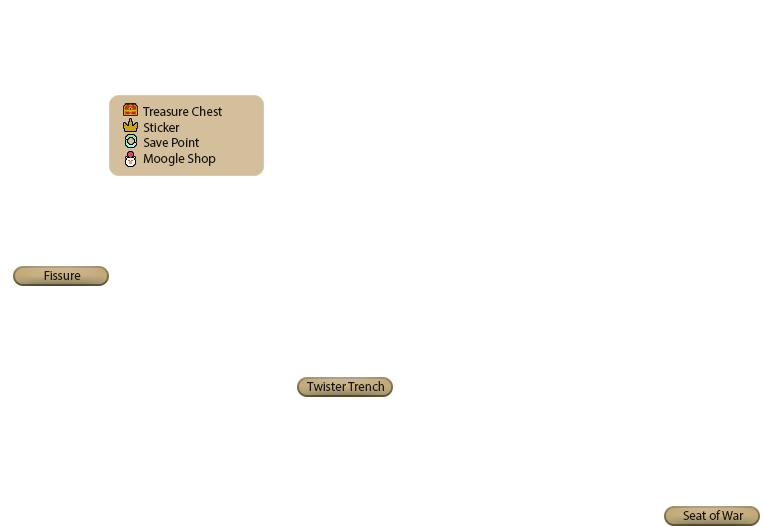
- #1: Elixir
- #2: Mega-Potion
- #3: Map
When you land, turn around to get the chests behind you. Then continue to the next area.
- #4: Windcutter
- #5: Mega-Potion
- #6: Mega-Ether
- #7: Megalixir
- Traffic Cone Sticker
In this area, you will see several tornadoes moving around. When you get closer, they will come towards you, and if they touch you, a fight will start. There are different patterns inside: normal fight, slow enemies, fast enemies or giant Unversed (this is the worst, in my opinion, they can be hard to target when they fly).
- Save Point
You will find your last Save Point and Moogle Shop here. Get ready for the final boss(es)!
You can focus on Xehanort at this point. Shotlocks work well for this, but keep a close eye on Vanitas especially when you are targeting. When his HP reaches 50%, you enter the next phase.
Master XehanortTips are incoming.
Between phases, you will receive a Maximum HP Bonus, and be rewarded with the Xehanort's Report 2.
Congratulations, Terra's path is finished! If you followed this guide, you still have two stories to complete. Let's go!
Ventus' path
Please note that this section will be way less verbal than Terra's, as most information are already given there. However, you will find maps for Ventus for every world and the list of treasures, as well as boss advice and the like. Basically, if you feel like you're missing information, it probably is in Terra's walkthrough, and you should be able to find your way easily just by looking at the map and following the given area order.
Land of Departure
After another cut scene, you are thrown into a fight. You will receive a Maximum HP bonus and the Fever Pitch Command Style.
When the next cut scene is over, you will unlock Terra and Aqua's D-Links. Ensues another cut scene after which you will receive the Xehanort's Letter and unlock the Land of Departure (Keyblade) Command Board.
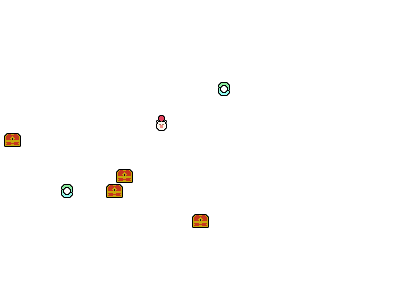
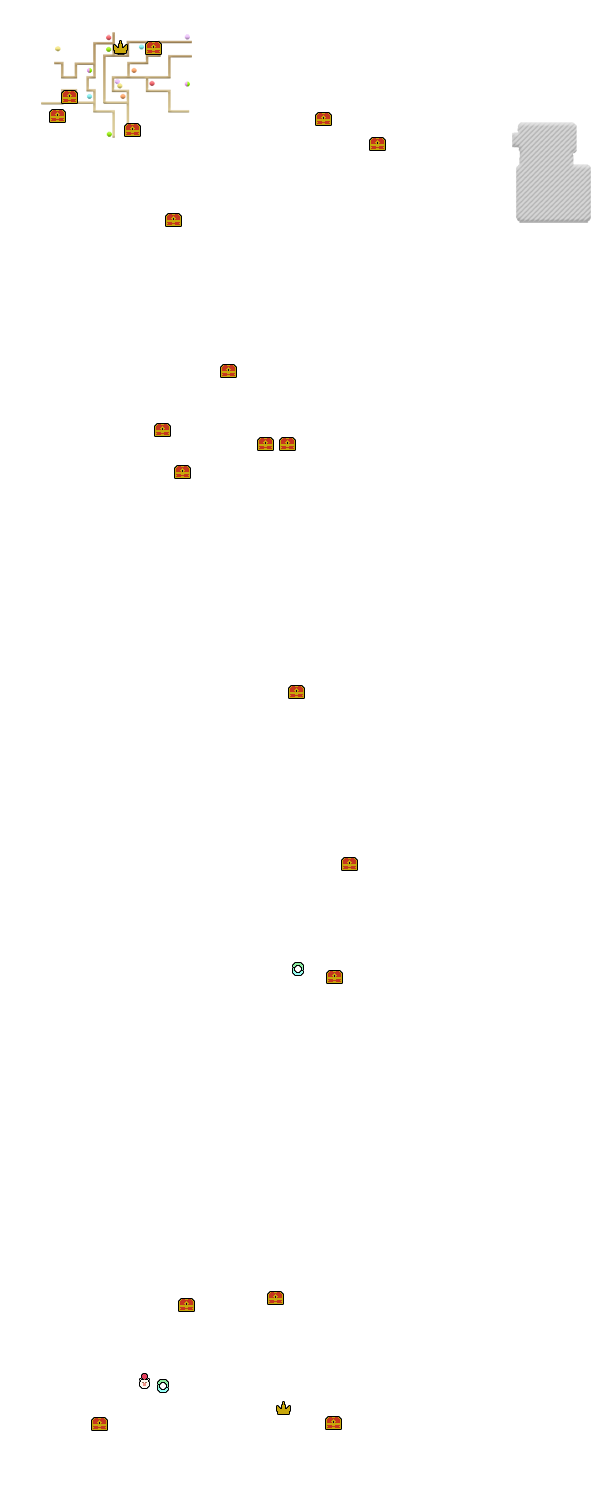
Dwarf Woodlands
 Mountain Trail
- #12: Potion
- #13: Ether
- #14: Potion
Mine Entrance
- Balloon Sticker
- Save Point
- Moogle Shop
The Mine
- #1: Payback Raid
- #2: Panacea
- #3: Mini
You have to find the dwarves. Go straight ahead to find a chest, and two dwarves in the crates to the right. Be careful, one of them defends himself!
Follow the path and you will find two other crates, one of them running away from you. Further ahead, there is another one that is even faster.
Finally, hit mine cart a few times – be careful not to stand in front of it!
Cottage Clearing
- #8: Fire
- #9: Poison
- #10: Map
- Ice Cream Sticker
- Save Point
Follow the river to find the chest with Poison inside. To reach the sticker, jump on the stump, then towards the sticker while hitting with your Keyblade.
The Cottage
- #11: Attack Recipe
Deep Woods
- #5: Shimmering Crystal
- #6: Potion
- #7: Ether
After a cut scene, you have to protect Snow White while she crosses the woods. Stay close to her since she tends to wander a bit. You receive a Maximum HP Bonus.
Go back into the woods and get ready for a boss fight.
Mad Trent
This boss is easier to defeat with range attacks, since the poison puddles are released close to it. Strike Raid and Shotlocks work pretty well.
- Jump: the boss will jump on you three times, similar to Terra's Enchanted Dominion boss. Avoid or jump when it lands, but be mindful of the poison puddles that will spawn all around you.
- Spin: the boss will spin on itself, hurting you if you're too close and throwing flames around it. Just stay away.
- Roots: the boss digs into the ground, making its roots attack you from below. The number of roots depends on its remaining HPs: close to the end, it will have more. You can roll to avoid them.
- #12: Potion
- #13: Ether
- #14: Potion
- Balloon Sticker
- Save Point
- Moogle Shop
- #1: Payback Raid
- #2: Panacea
- #3: Mini
You have to find the dwarves. Go straight ahead to find a chest, and two dwarves in the crates to the right. Be careful, one of them defends himself!
Follow the path and you will find two other crates, one of them running away from you. Further ahead, there is another one that is even faster.
Finally, hit mine cart a few times – be careful not to stand in front of it!
- #8: Fire
- #9: Poison
- #10: Map
- Ice Cream Sticker
- Save Point
Follow the river to find the chest with Poison inside. To reach the sticker, jump on the stump, then towards the sticker while hitting with your Keyblade.
- #11: Attack Recipe
- #5: Shimmering Crystal
- #6: Potion
- #7: Ether
After a cut scene, you have to protect Snow White while she crosses the woods. Stay close to her since she tends to wander a bit. You receive a Maximum HP Bonus.
Go back into the woods and get ready for a boss fight.
This boss is easier to defeat with range attacks, since the poison puddles are released close to it. Strike Raid and Shotlocks work pretty well.
- Jump: the boss will jump on you three times, similar to Terra's Enchanted Dominion boss. Avoid or jump when it lands, but be mindful of the poison puddles that will spawn all around you.
- Spin: the boss will spin on itself, hurting you if you're too close and throwing flames around it. Just stay away.
- Roots: the boss digs into the ground, making its roots attack you from below. The number of roots depends on its remaining HPs: close to the end, it will have more. You can roll to avoid them.
You receive a Deck capacity Bonus, the Firestorm Command Style, the Treasure Trove Keyblade and forge a D-Link with Snow White. You can come back if you want to get the chest in the Flower Glade, past the Deep Woods.
- #4: Soothing Crystal
Castle of Dreams
- #4: Potion
After the cut scene, continue to the left.
- #1: Map
- #2: Stun Edge
- #3: Magic Recipe
- Fireworks Sticker
- Save Point
- Moogle Shop
Jump on the yarn ball to make it roll. It will help you reach higher grounds: the chair so you can jump on the dresser, then the bed from where you can jump on the bedside table. When you're done, go back to the Mousehole.
- #10: Zero Gravity
- #11: Balloon Letter
- #12: Blizzard
- #13: Fleeting Crystal
In this room, you have to gather several items.
- The Pink Fabric is lying on the floor.
- The White Lace is on the sofa.
- The White Sash is on top of some boxes: you need another yarn ball to reach it.
You can reach a chest by jumping on a furnishing with the yarn ball. You will find another chest on a pile of boxes. Go to the Mousehole again but through the north-eastern entrance.
- #5: Thunderstorm
- #6: Ether
- #7: Pulsing Crystal
- #8: Potion
- #9: Hungry Crystal
- Louie Sticker
Use the forks to reach the highest platforms. You can either go right or left here.
- If you choose left, get the chest then exit. If you want to get the chest now, you will need Sliding Dash: after defeating any Unversed close by, jump from the exit–and be careful to not have the fork in the way–then Slide. You should be able to grab onto the beam. You can use the Command again to go back where you were, so you don't have to go through the Wardrobe Room again.
- If you choose right, hit the match box so that it sticks out to the other side. You can then use it to reach a cobweb with two cheese pieces stuck in it. Combo them to make them fall to the ground, and use them to reach a chest and the exit. There is also a hidden chest that isn't clearly visible, behind a wall (see map, the one on the south-west). To get the sticker, use a well timed Sliding Dash after jumping down.
If you went to the left, you get the Pink Thread and you can walk on the books to reach the last chest of the Wardrobe Room. If you chose the right path, you get the White Button.
After a cut scene, go back to the Wardrobe Room and get ready for a boss fight!
Like the previous boss, it will be easier to attack him from afar. However, when he jumps on you, avoid and then quickly come back and hit him so you can ride him with □. Press the buttons being displayed and he will be temporarily stunned after a few times. Use the Bronco Strike when available! And there is really not much more to it.
- Claws: if you get too close, he will claw at you.
- Charge: get out of the way, and he might hit his head against a wall or a furnishing and stun himself!
You receive the Diamond Dust Command Style, the Cinderella's D-Link, the Stroke of Midnight Keyblade and unlock the Castle of Dreams (Royal) Command Board.
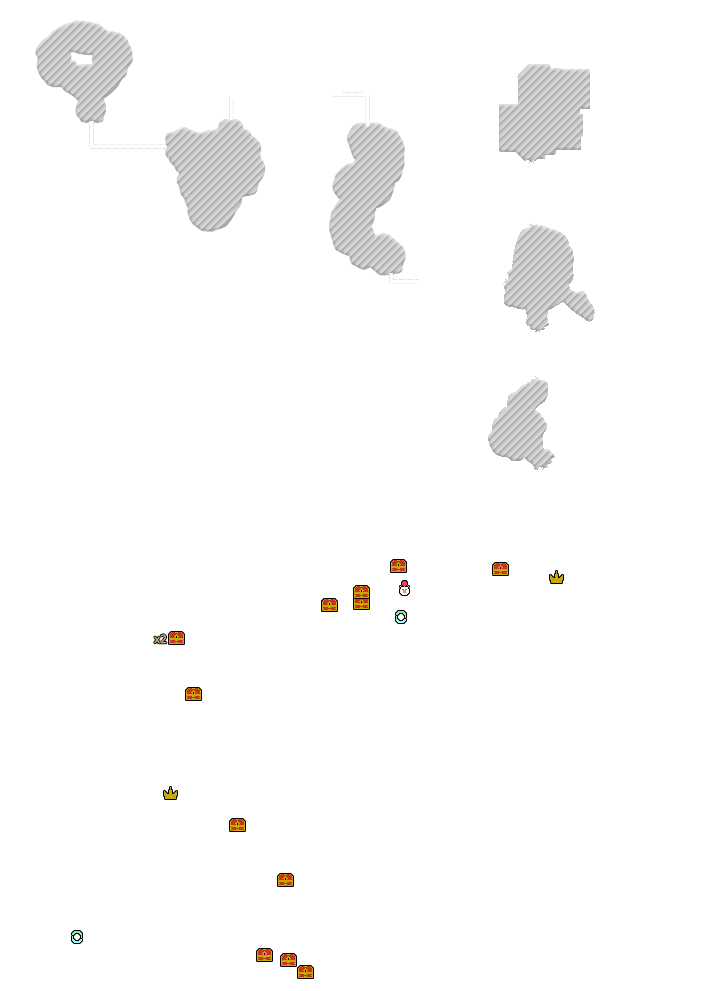
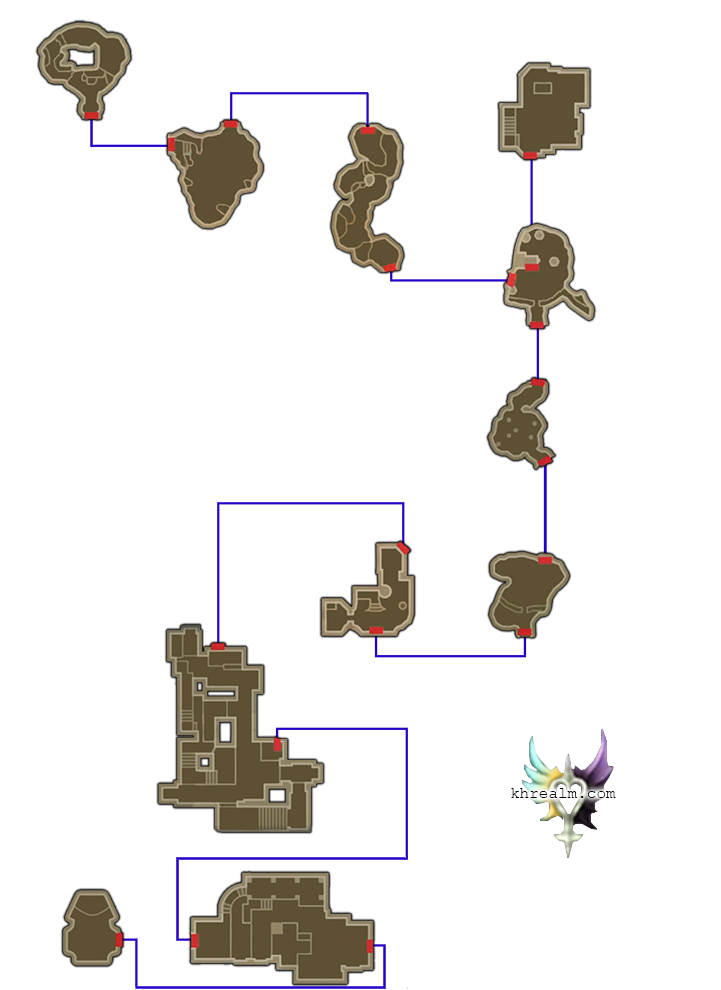
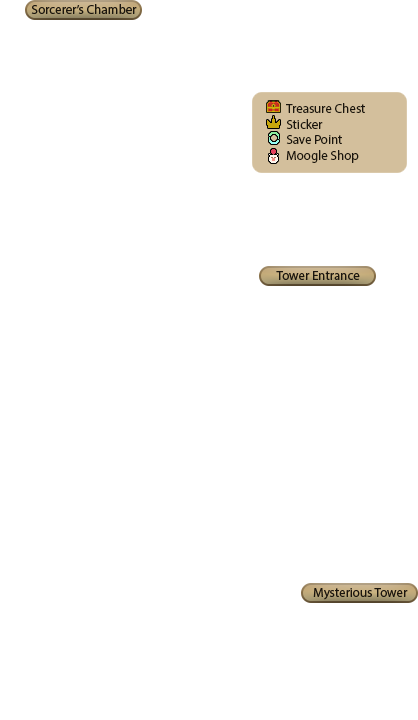
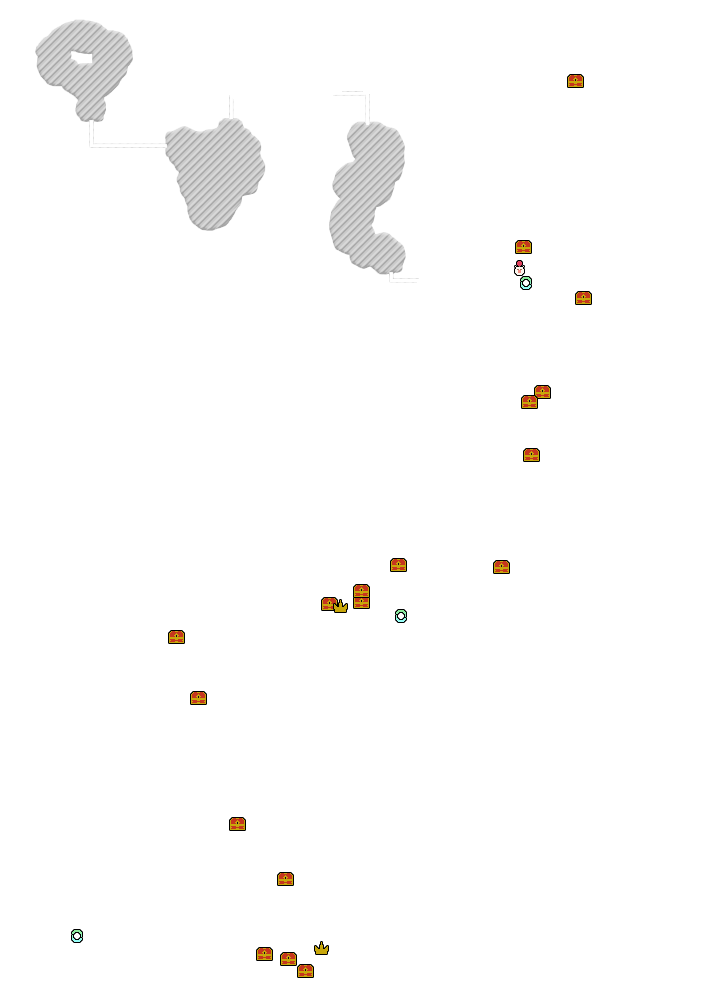
Enchanted Dominion
- Save Point
- Moogle Shop
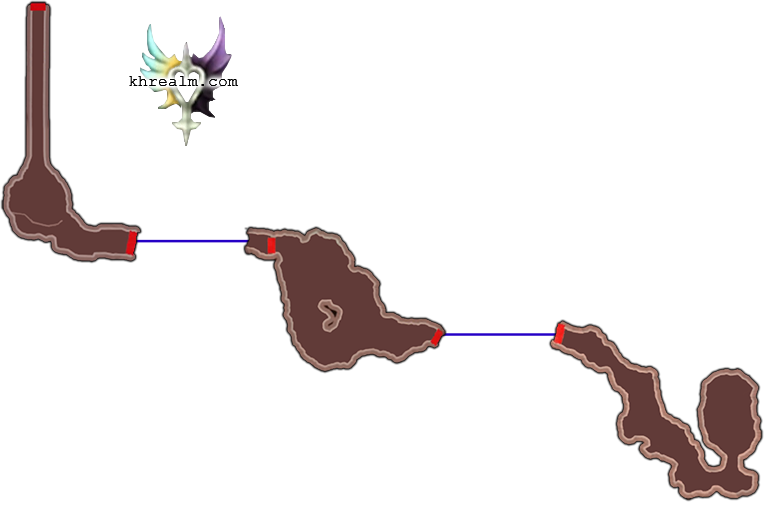
You need to go all the way to Forbidden Mountain, past the Waterside. You can get the chest in the Tower Room first.
- #19: Sleep
- #18: Hi-Potion
- #16: Hi-Potion
- #17: Thunder
- Dewey Sticker
You need Glide for the sticker.
- #15: Map
- #14: Potion
- #13: Ether
- #1: Balloon Letter (come back later)
- #2: Soothing Crystal (come back later)
- #3: Cure
- #4: Wellspring Crystal (come back later)
- #5: Absolute Zero
There are several chests here that you can't get before coming back later.
Be careful as Maleficent's minions are crawling around here. The ones with a pike will get close then attack, and archers will shoot at you from afar. You can make them run around wildly by using magic on them, or any kind of elemental attack, even if it's physical.
- #6: Hi-Potion
You will have to fight against Maleficent's minions. Use the same tactic as before so you're not overwhelmed by their numbers. Staying close to one of their spawn points can help as they won't surround you as easily.
- #9: Wellspring Crystal
- #10: Magnet
- Hungry Crystal
- Hi-Potion
- Confetti Sticker
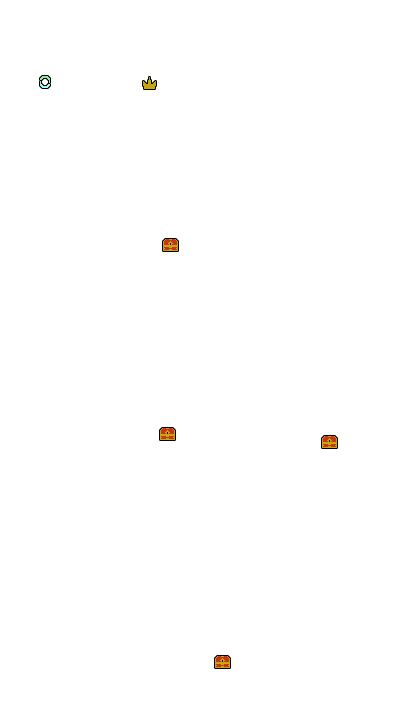
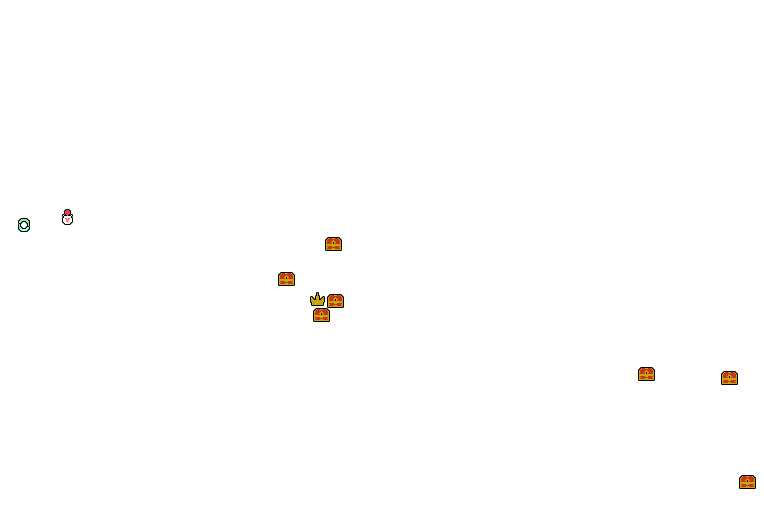
I will give text explanations here, but the map above might be easier to understand. This room is full of invisible walls and colored teleporters. Those of the same color are connected.
Follow the wall to your right until you see the blue teleporter. Use it.
Follow the only available path and use the orange teleporter.
Go down the stairs.
- #7: Fleeting Crystal
- #8: Tornado Strike
When you get to the edge of the platform, don't fall down. First, you can get the chest on the isolated platform using Sliding Dash. Then, go back and jump to the other platform. Open the chest, follow the path to find some stairs and you will be back into the Hall.
There is only one way to go and it leads to a chest and a green teleporter. You will reach a dead-end with two chests. You can then go back all the way to the dungeon.
This time, fall down and go down the stairs to your right.
You are back in the Hall. There is only one way, with a teleporter that switches color between yellow and purple. Touch it when it's purple to get a chest and a sticker, go back, then wait for yellow.
Follow the path that leads to the red teleporter. After a cut scene, get back to Maleficent's Throne and get ready for a boss fight.
Depending on the difficulty you chose, she might be a bit of a challenge. Paying attention to what she says and where she teleports to will help predict her next move and act accordingly.
- Thunder: line attack directed towards you, twice. If she is on the side, you can just stay close to the wall below her, or behind a pillar, to not get hit. If she is in the middle, roll away at the last moment.
- Flames: when she teleports to the middle, she will most likely summon waves of flames around her. Quickly go towards the fairy circle and use □ to activate Joint Force. Maleficent will fall asleep for a few seconds if you succeed. If you got Tornado Strike earlier, now is a good time to use it.
- Multiple Thunder: when she teleports in front of her throne, most of the time, she will summon multiple bolts of lightning aiming at you or right next to you, several times. Just avoid them by running around.
- Staff: if you get close to her, she might hit you with her staff. At level 1, this is a one-shot, or very close.
- Cloud of darkness ("Behold the mistress of all evil!"): she will transform into a cloud of darkness and spin towards you. Roll away until she transforms back. You might be able to cancel her move by attacking her when she's still talking.
You receive a Maximum HP Bonus, the Thunderbolt Command Style and the Fairy Stars Keyblade.
You can come back now for the remaining chests at the Gates. Two paths unlocked.
First, when you enter the Gates, jump on the broken platform and again. Go to the right then up the stairs to find two chests. The last one is near Maleficent's Throne entrance. The corner of the wall to the left crumbled and you can jump on it too.
The Badlands
Tips incoming
You receive High Jump and Mickey's D-Link at the end of the fight.
Radiant Garden
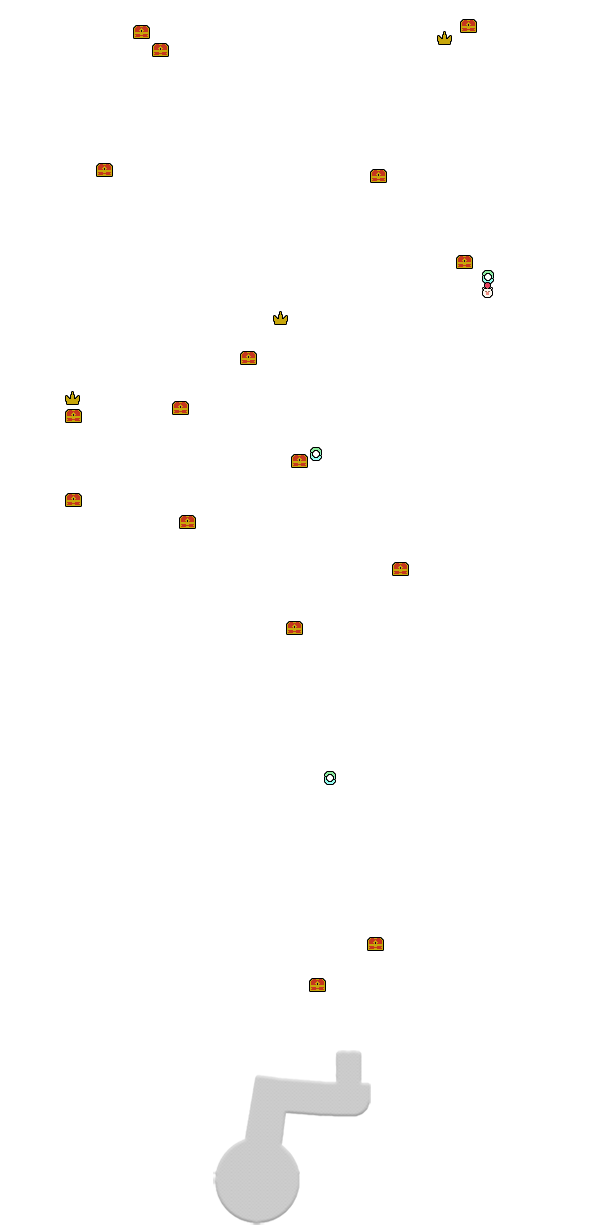
- #3: Ether
- #4: Potion
- #11: Hi-Potion
- #12: Binding Strike
- #13: Wellspring Crystal
- #14: Slow
- Ice Cream Sticker
Be careful in this area, as there are a lot of Mandrakes that can hit you from far away, even through bushes.
- #15: Hi-Potion
- #16: Freeze Raid
- Fireworks Sticker (might not be reachable)
- Save Point
Come back after the cut scene for the chest, and if your High Jump is high level enough, you can also get the sticker. Then go back to Central Square, and follow the Unversed.
- #8: Map
- Save Point
- Moogle Shop
Go to Merlin's House before moving on.
- #10: Block Recipe
Read the book to unlock The Hundred Acre Wood (Honey Pot) Command Board.
- #9: Counter Rush
- Huey Sticker
Use the water jets to reach the platforms. You can reach the sticker by jumping then hitting the air with your Keyblade, or using Sliding Dash.
- #5: Panacea
- #6: Fira
- #7: Hi-Potion
Be careful as there are Mandrakes in the water. Get ready for a boss battle when reaching the next area.
This is basically the same strategy as with Terra:
- Charge: it will surround itself with fire and charge towards you. It can be blocked.
- Fireballs: several fireballs are launched and drop around the boss. More will crawl towards the sides of the arena.
- Laser: when the boss becomes dark red, it will use a big laser. You can either stay behind and move with the boss–or under it when the feet are destroyed–or Roll under the laser by timing it properly.
- Spinning attack: when the three parts are separated, they can spin around the arena, all at the same time. Staying in a corner and getting ready to guard is usually safe.
- Trample: the feet, when separated from the other parts, will trample the ground a few times. Can be guarded, or you can just avoid them.
- Lasers shower: short white lasers will be shoot around the whole arena. You can guard them if you face the boss properly.
- Duo/Trio laser: when separated, all parts still alive can link themselves with a laser and rotate a few times. Just don't stand in the middle and be careful when attacking them.
You get a Maximum HP Bonus and the Cyclone Command Style. Go back the Central Square and get ready for another fight. You will get the Reversal Command after the fight.
Now, go down the stairs to the south.
- Save Point
- #1: Soothing Crystal
- #2: Pulsing Crystal
After a cut scene, go back to Central Square–yes, again. You receive the Keyblade Frolic Flames.
Disney Town
- #1: Map
- #2: Potion
- Save Point
After the cut scene, talk to Huey, Dewey and Louie. You will need to help them make ice cream in the Ice Cream Beat mini-game. You unlock the Disney Town (Toon) Command Board. You can come back right away for a few chests.
- #8: Mega-Ether
- #9: Mega-Potion
- #10: Chaos Crystal
- #11: Thunder
- #12: Thunder
- #13: Mega-Potion
- Mickey Sticker
Activate the machinery with Thunder-based attacks and/or the Thunderbolt Command Style. Use the Mickey-shaped cogs and the mechanical hands to reach the chests (two on the right and a sticker, one next to the cog, one to the left).
- #14: Panacea
- #15: Action Recipe
- #16: Aerial Slam
- #17: Break Time
- #18: Wellspring Crystal
- Minnie Sticker
There is a huge pinball in this room, that you need to use in order to reach chests and the Raceway exit. There are two chests on the left, one in the middle behind bars (that will unlock once you hit enough bumpers), one next to the exit, and one next to the ceiling on the right, along with a sticker.
- #3: Superglide (not reachable)
- #4: Reversal Slash
- #5: Slot Edge
- #6: Shimmering Crystal
- #7: Stop
- Chip Sticker
You need the Glide Command to reach the Superglide chest. But you can already get the chest next to Pete's Rec Room entrance and the sticker on the right.
Olympus Coliseum
You have to fight some Unversed when you land.
- #1: Fire Strike
- #2: Cura
- #3: Mega-Potion
- Confetti Sticker
- #4: Map
- Save Point
- Moogle Shop
Talk to Hercules. You have to break more urns than him in the allotted time. Hit the barrel to make it fall on the side and jump on it so you can break the urns faster. Be careful as Hercules can also use it!
You receive a Maximum HP Bonus. The second phase gives you a Deck capacity Bonus. After the cut scene, go back to the first area, where you will fight Unversed alongside Hercules. Commands like Gravity/ra/ga, Magnet/ra/ga or Tornado Strike work pretty well.
You're rewarded with the Air Slide Command, the Mark of a Hero Keyblade and forge a D-Link with Zack.
Deep Space
Before reaching the ship, you have to fight a boss Unversed. Attack when it moves around, and use your Barrier when it flails its tentacles or charges you. You don't need to kill it. You receive the Wingblade Command Style.
- #1: Abounding Crystal
After a cut scene, go back to the Durgon Transporter for the chest if you want.
- #2: Hi-Potion
- #3: Pulsing Crystal
- #4: Mega-Ether
- #5: Hi-Potion
You will have to fight several waves of Unversed in the corridor. Depending on the difficulty you chose and your level, I would recommend using the Mark of the Hero Keyblade to make things easier.
- #6: Map
- Save Point
- Moogle Shop
- #7: Thundara
- #8: Zero Gravira
- #9: Pulse Bomb
- UFO Sticker
Use the computer to turn off the gravity so you can jump high enough. Turn it off halfway to get a chest then turn it on again to reach the door near the ceiling.
- #12: Xehanort's Report 1
- #13: Mega Attack Recipe
- #14: Fire Surge
- #15: Fleeting Crystal
- Ice Cream Sticker
You can block the guns attacks to throw them back at them. Get the three chests, turn off the gravity to get the fourth and the sticker, then turn it off again to reach the exit.
- #16: Mega Point
- Save Point
- #10: Chaos Crystal
- #11: Mine Shield
You will have to come back after the boss battle to reach the chests–except if you manage to get them during the fight. One of them is above the gravity computer, the other near the middle, up the bridge.
Ignite works well for this boss.
You receive a Maximum HP Bonus, forge a D-Link with Experiment 626, obtain the Hyperdrive Keyblade and unlock the Deep Space (Spaceship) Command Board.
Never Land
- #10: Hi-Potion
- #11: Panacea
Turn around after landing to get a chest. You can continue this way to get another chest in the next area, then turn back.
- #17: Megalixir
- Rainbow Sticker
You can get the sticker with a Sliding Dash, but you can also wait for the Glide Command.
- #7: Aeroga
- #8: Blitz
- #9: Elixir
- Dale Sticker
You can reach the sticker with two Air Slides from the little island with the chest with an Elixir inside.
- #12: Balloon Letter
- #13: Mega-Ether
- #14: Fleeting Crystal
- Save Point
- Moogle Shop
- #15: Map
- #16: Abounding Crystal
- Save Point
Next, go to the Indian Camp.
You have to fight waves of Unversed in the area. After that, go back all the way to the Mermaid Lagoon, where you receive the Glide Command after a cut scene.
- #4: Hi-Potion
- #5: Firaga
- #6: Treasure Raid
You can break the stones by hitting them with a combo or baiting cannonballs on it. A chest is hidden between one.
- #1: Megalixir
- #2: Mega-Potion
- #3: Ether
- Save Point
- Moogle Shop
Get ready for a boss fight, and wait for it to be over to get two of the chests.
Compared to Terra's boss when he was in Never Land, this one is much harder, especially if you're playing Critical. Ignite works well again, and being patient definitely helps.
Block and counter-attack and try to push him to the sides of the small island you're fighting on. When he staggers, just hit him to make him fall. The crocodile will love it!
You receive Peter Pan's D-Link, the Pixie Petal Keyblade and unlock the Never Land (Skull) Command Board.
Mysterious Tower
- #1: Magnega
- #2: Wellspring Crystal
- #3: Chaos Crystal
- Ice Cream Sticker
- #4: Mega Magic Recipe
Go up the stairs for a final cut scene.
You forge a D-Link with Donald and Goofie after the cut scene.
The Badlands + Land of Departure
After several cut scenes, you receive the Lost Memory and Xehanort's Report 9. It's time to gather the remaining treasures and stickers!
- Enchanted Dominion (Audience Chamber): You need to High Jump then Glide from the top of the stairs.
- Radiant Garden (Front Doors): High Jump.
- Disney Town (Raceway): from Pete's Room, you need to High Jump then Glide to reach the platform with blue walls for a chest.
Keyblade Graveyard
- #1: Elixir
- #2: Mega-Potion
- #3: Map
- #9: Xehanort's Report 12
- Ice Cream Sticker
Turn around after you arrive to get a few chests and a sticker, then continue towards the next area.
- #4: Wind Raid
- #5: Mega-Ether
- #6: Mega-Potion
- #7: Megalixir
- #8: Elixir
- Ice Cream Sticker
If you already played with Terra, you know this area. Tornadoes will come towards you if you get too close and when they catch up, you will have to fight Unversed. The pattern inside can be either of: normal, fast/slow enemies, or huge ones. There are three chests in the middle, one on each side near the next area's entrance, and the sticker on the right side.
- Save Point
- Moogle Shop
Get ready for Ventus' final boss! To be honest, I found it harder than Terra's, probably because he's faster and I was level 20 or 25 when I did it.
You get a Maximum HP Bonus at the end of this phase.
Vanitas (second phase)Congratulations! You receive Xehanort's Report 10 and, if you followed this guide, you only have Aqua's story left.
Aqua's Path
Please note that this section will be way less verbal than Terra's, as most information are already given there. However, you will find maps for Aqua for every world and the list of treasures, as well as boss advice and the like. Basically, if you feel like you're missing information, it probably is in Terra's walkthrough, and you should be able to find your way easily just by looking at the map and following the given area order.
Land of Departure
After a fight, you receive a Maximum HP Bonus, the Spellweaver Command Style, forge a D-Link with Ventus and Terra and unlock the Land of Departure Command Board.
Castle of Dreams
- #5: Fleeting Crystal
- #6: Barrier Surge
- #7: Potion
- #8: Thunderstorm
- Fireworks Sticker
- #9: Map
After the cut scene, you automatically receive the Map of this world.
- #2: Hi-Potion
- #3: Slow
- #4: Potion
- Bubble Sticker (unreachable)
- Save Point
You need High Jump for the sticker.
- #1: Magic Recipe
Get close to the front doors to trigger a cut scene. Then, talk to the Fairy Godmother. You will have to fight Unversed while protecting Jaq.You receive the Thunderbolt Command Style.
Now, go back to the Forest and get ready for a boss fight.
You receive a Maximum HP Bonus, the Stroke of Midnight Keyblade, Cinderella's D-Link and unlock the Castle of Dreams (Royal) Command Board.
You can go back to the Land of Departure now to get the chests.
Land of Departure
- #1: Shimmering Crystal
- #2: Hi-Potion
- #3: Bind
- #4: Fleeting Crystal
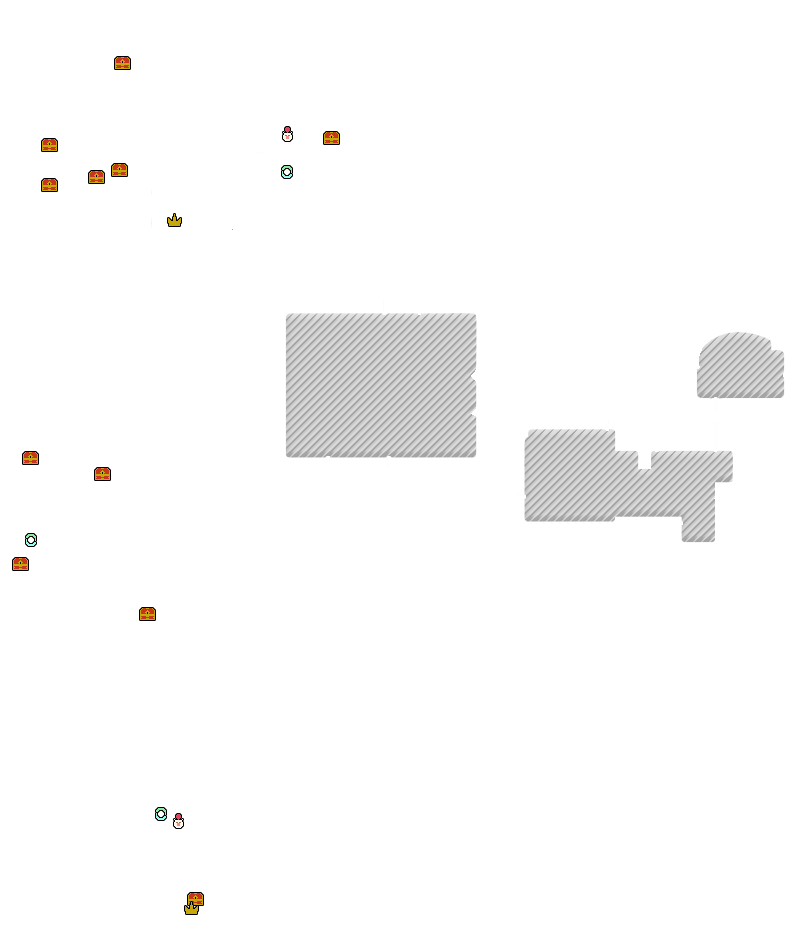
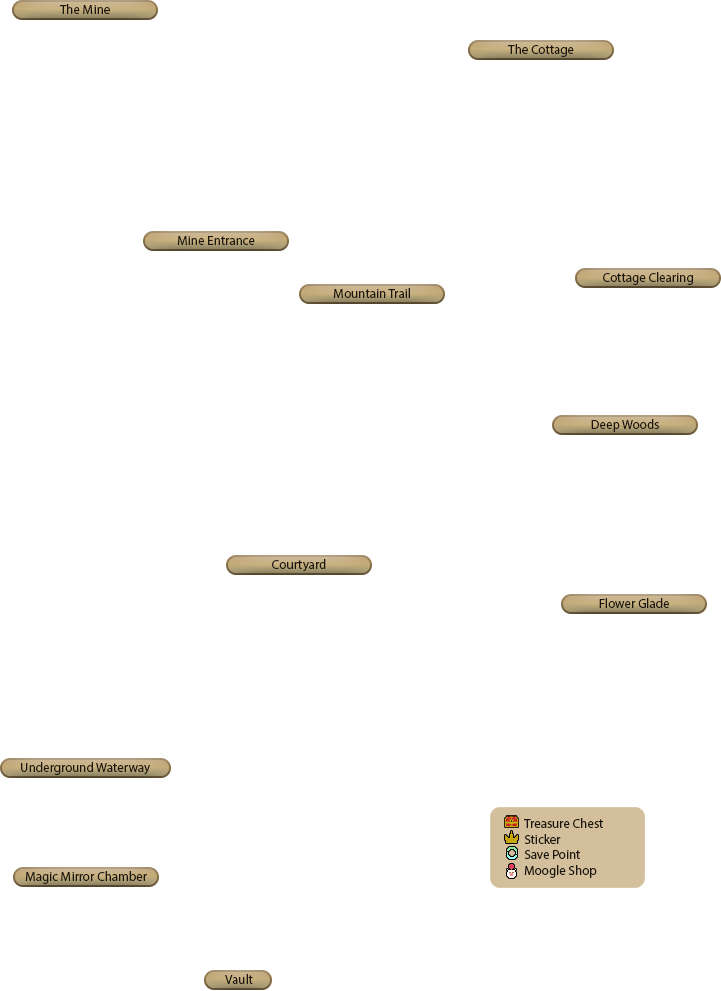
Dwarf Woodlands
 Cottage Clearing
- #16: Payback Surge
- #17: Poison
The Cottage
- #18: Attack Recipe
Deep Woods
- #13: Hi-Potion
- #14: Ether
- #15: Potion
Flower Glade
- #12: Hungry Crystal
Courtyard
- #9: Potion
- #10: Map
- #11: Fleeting Crystal
- Picnic Basket Sticker
- Save Point
Underground Waterway
- #5: Shimmering Crystal
- #6: Fire
- #7: Fleeting Crystal
If you came here with Terra, you already know how the gates work. If not, here is a recap: the first wheel opens the gate in front of it, next to the entrance to the Vault. Then, up the stairs, you will find a second wheel that opens two gates. You can't get both chests in one go so you have to open them twice. Also, unlike Terra, the Prize Pods are not behind the third gate, but at the Flower Glade instead.
Vault
- #1: Balloon Letter
- #2: Potion
- #3: Shimmering Crystal
- #4: Magnet
- Bubble Sticker (unreachable)
Mirror
Tips incoming.
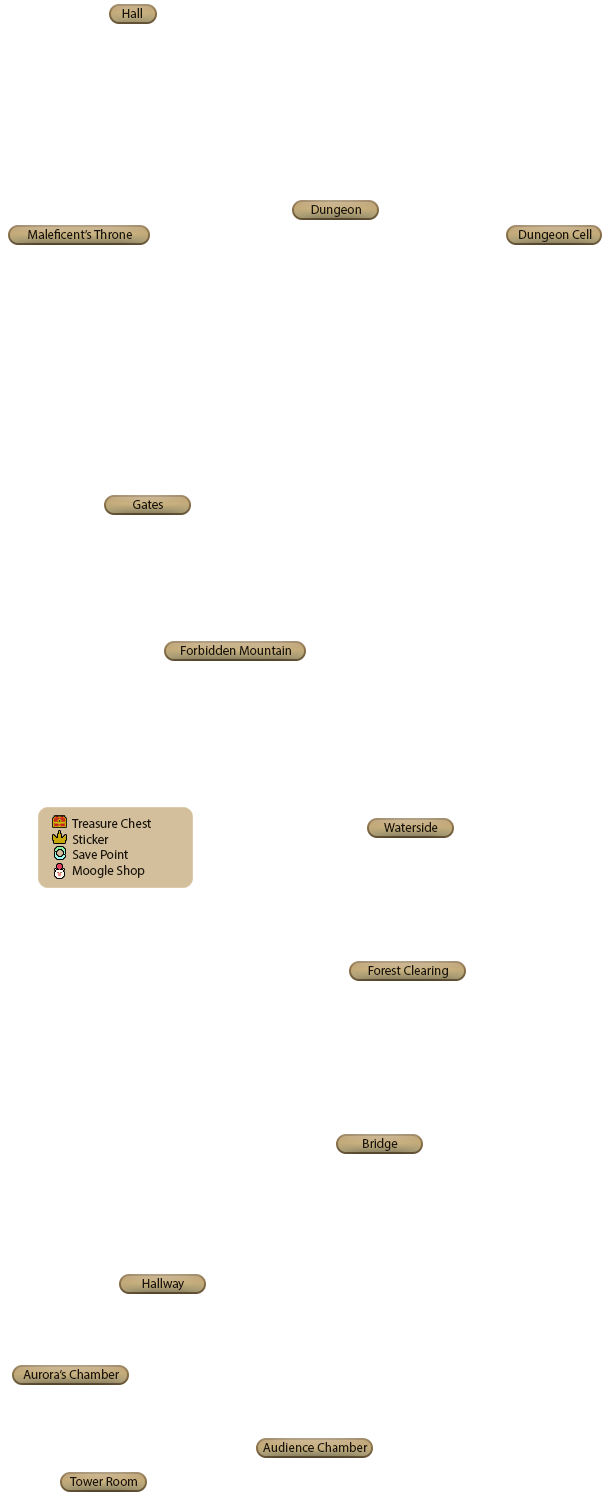
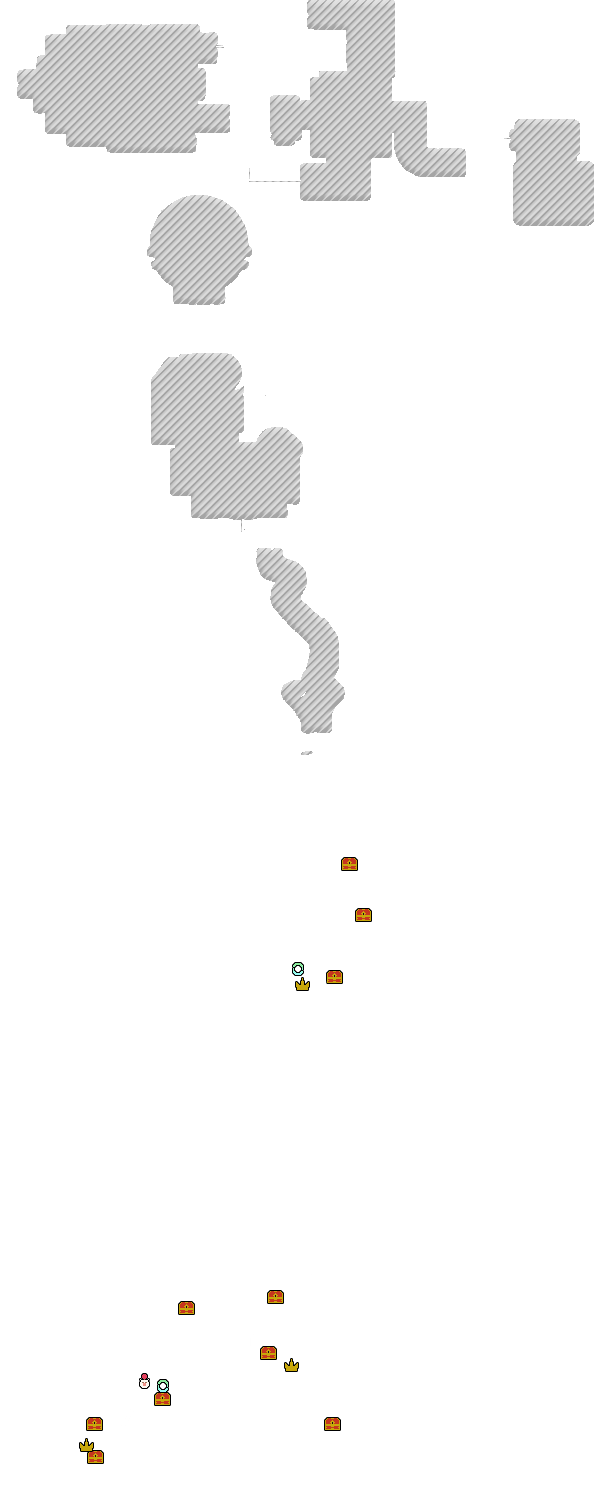
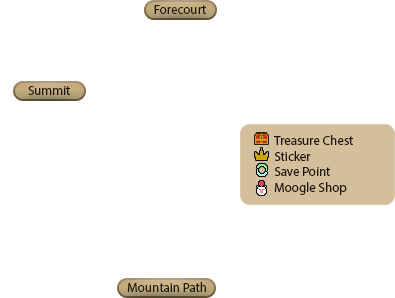
Enchanted Dominion
 Forbidden Mountain
- #10: Hi-Potion
After a cut scene, follow the path up to the castle.
Gates
- #2: Absolute Zero
- #3: Cure
- #4: Wellspring Crystal
- #5: Pulsing Crystal
- #6: Sleep
As always, this area is teeming with Maleficent's minions. They run around when hit with magic or elemental-based attacks.
Two of the chests can be opened a bit later, on your way out.
Maleficent's Throne
- #7: Confusion Strike
Dungeon Cell
- #1: Map
- Save Point
- Moogle Shop
Dungeon
- #7: Hi-Potion
- #9: Ice Barrage
- Horace Sticker (unreachable)
You will have to come back for the sticker after getting Doubleflight, but you can reach the second chest by using a Sliding Dash, like for Ventus.
Hall
There are no invisible walls in the Hall this time–but no treasures either. Don't forget to open the chest next to Maleficent's Throne in the next room, then get ready for a fight in the next area.
You have to open the gates to escape. When your ally calls for you, use □ then X to jump. Don't forget to get the two chests you couldn't reach before.
You obtain High Jump when it's over.
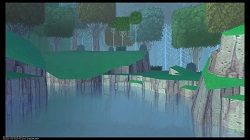
Waterside
- #11: Ether
- #12: Balloon Letter
- #13: Potion
Forest Clearing
- Flower Sticker
- Save Point
Maleficent
Tips incoming
- #16: Payback Surge
- #17: Poison
- #18: Attack Recipe
- #13: Hi-Potion
- #14: Ether
- #15: Potion
- #12: Hungry Crystal
- #9: Potion
- #10: Map
- #11: Fleeting Crystal
- Picnic Basket Sticker
- Save Point
- #5: Shimmering Crystal
- #6: Fire
- #7: Fleeting Crystal
If you came here with Terra, you already know how the gates work. If not, here is a recap: the first wheel opens the gate in front of it, next to the entrance to the Vault. Then, up the stairs, you will find a second wheel that opens two gates. You can't get both chests in one go so you have to open them twice. Also, unlike Terra, the Prize Pods are not behind the third gate, but at the Flower Glade instead.
- #1: Balloon Letter
- #2: Potion
- #3: Shimmering Crystal
- #4: Magnet
- Bubble Sticker (unreachable)
Tips incoming.
- #10: Hi-Potion
After a cut scene, follow the path up to the castle.
- #2: Absolute Zero
- #3: Cure
- #4: Wellspring Crystal
- #5: Pulsing Crystal
- #6: Sleep
As always, this area is teeming with Maleficent's minions. They run around when hit with magic or elemental-based attacks.
Two of the chests can be opened a bit later, on your way out.
- #7: Confusion Strike
- #1: Map
- Save Point
- Moogle Shop
- #7: Hi-Potion
- #9: Ice Barrage
- Horace Sticker (unreachable)
You will have to come back for the sticker after getting Doubleflight, but you can reach the second chest by using a Sliding Dash, like for Ventus.
There are no invisible walls in the Hall this time–but no treasures either. Don't forget to open the chest next to Maleficent's Throne in the next room, then get ready for a fight in the next area.
You have to open the gates to escape. When your ally calls for you, use □ then X to jump. Don't forget to get the two chests you couldn't reach before.
You obtain High Jump when it's over.
- #11: Ether
- #12: Balloon Letter
- #13: Potion
- Flower Sticker
- Save Point
Tips incoming
You receive a Maximum HP Bonus, the Firestorm Command Style, the Fairy Stars Keyblade and Xehanort's Report 6.
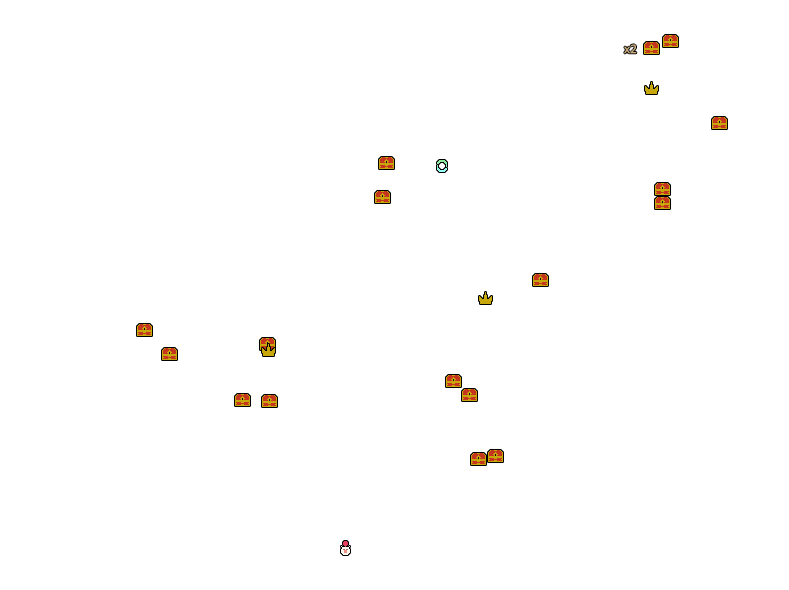
Radiant Garden
- #1: Potion
- #2: Ether
- #10: Zero Gravity
- #11: Wellspring Crystal
- #12: Strike Raid
- #13: Fleeting Crystal
- #14: Map
- #15: Panacea
- #16: Mine Square
- Juice Sticker (unreachable)
- Save Point
Go up the stairs for a cut scene and a fight against Unversed. You receive the Destiny's Embrace Keyblade and forge a D-Link with Mickey.
Go back to the Gardens, then up the stairs, and get ready for a boss fight.
Tips incoming.
- #3: Hi-Potion
- #4: Thundara
- #5: Hi-Potion
- #6: Block Recipe
- Donut Sticker (unreachable)
You need High Jump to reach the sticker. As always, be careful if you walk in the canal because of the Mandrakes.
- #7: Counter Blast
- #8: Soothing Crystal
- Flower Sticker
- Save Point
- Moogle Shop
- #9: Xehanort's Report 3
Read the book to unlock The Hundred Acre Wood (Honey Pot) Command Board. Go back to the Central Square and get ready for a boss fight.
Tips incoming.
Disney Town
- #1: Map
- #2: Potion
- Minnie Sticker (unreachable)
- Save Point
Hit the mailbox to get Confetti. You need Doubleflight to reach the sticker.
You can get the other treasures first or talk to Horace at the Fruitball Court to play Fruitball. You receive a Balloon Letter and unlock the Disney Town (Toon) Command Board.
- #6: Hungry Crystal
- #7: Mega-Potion
- #8: Chaos Crystal
- #9: Thunder
- #10: Thunder
- #11: Pulsing Crystal
- #12: Mega-Potion
As always, use Thunder-based attacks on the electric meter and use the Mickey-shaped cogs, hands and cylinders to reach all the chests.
- #13: Panacea
- #14: Action Recipe
- #15: Aerial Slam
- #16: Break Time
- #17: Soothing Crystal
Again, use the giant pinball to get all the chests and exit to the Raceway.
- #3: Abounding Crystal
- #4: Firage
- #5: Slot Edge (next to Pete's Rec Room exit)
- Daisy Sticker (unreachable)
You need Doubleflight for the sticker.
Olympus Coliseum
- #1: Fire Strike
- #2: Cura
- #3: Mega-Potion
- Fireworks Sticker
You have to fight Unversed when you arrive.
- #4: Map
- Save Point
- Moogle Shop
Talk to Phil and get ready for several waves of Unversed. You receive a Maximum HP Bonus. Then, a boss fight in two phases is coming!
Tips incoming
HadesTips incoming
You receive the Diamond Dust Command Style, the Mark of a Hero Keyblade and Zack's D-Link.
Deep Space
- #7: Ether
- #8: Balloon Letter
- Save Point
- Moogle Shop
When you land, you have to fight against Unversed, yet again. Exit the Control Room by the door on your right. There is nothing to get in the Ship Corridor, so keep going.
- #6: Hi-Potion
You can either fight or ignore the Unversed and keep going until you reach the Ship Exterior. There is another scripted battle where you fight on your Keyblade. You can use the pillars to gain speed and rotate through the center, but using your Keyblade commands might be easier and/or faster. You receive Air Slide. You're back in the Durgon Transporter room. Eliminate the enemies and use the teleporter.
- #5: Map
- Save Point
Go to the next area and get ready for a fight against waves of Unversed. You receive a Maximum HP Bonus and Aerial Slam. After the cut scene, come back in the room for the chests and sticker.
- #1: Teleport
- #2: Blitz
- #3: Abounding Crystal
- #4: Mega-Potion
- Dale Sticker
Like you (hopefully) did for Terra, use the various platforms to reach all the treasures. From the Control Room, exit on your left this time.
- #9: Fire Surge
- #10: Prism Rain
- UFO Sticker
Take the chest at the bottom then activate the gravity computer and go up. Deactivate the second computer to get the second chest, then activate it again for the UFO Sticker and the exit.
- #11: Zero Gravira
- #12: Hungry Crystal
- #13: Mega-Ether
You will have to come back after the boss fight to get all the chests, since the door is closed.
Tips incoming.
- #14: Mega Attack Recipe
- Save Point
You need to come back after the boss to access this room.
Never Land
- #8: Map
- #9: Mega-Potion
- Save Point
- #5: Hi-Potion
- Fireworks Sticker
High Jump and Air Slide to reach the sticker.
- #6: Mine Shield
- #7: Elixir
- Save Point
- Moogle Shop
- #1: Firaga Burst
- #2: Elixir
- Rainbow Sticker
Again, use High Jump and Air Slide to reach the sticker.
- #3: Hi-Potion
- #4: Ether
- #10: Panacea
- #11: Fleeting Crystal
After the cut scene, use the fairy dust to jump higher and reach the next area.
- #12: Time Splicer
- #13: Thundaga
- #14: Chaos Crystal
- #15: Firaga
- Chip Sticker
There are a few treasures here. You have to use the fairy dust again to reach them all. Be careful not to fall down or you will be back to the Base!
- #16: Mega-Ether
After entering the Gully again, you see a cut scene at the end of which you receive Doubleflight. Get ready for a boss fight and go the Indian Camp.
Tips incoming.
You receive a Maximum HP Bonus, the Ghost Drive Command Style, the Pixie Petal and forge a D-Link with Peter Pan.
After another cut scene, you also receive the Stormfall Keyblade and unlock the Never Land (Skull) Command Board.
Mysterious Tower
- #1: Magnega
- #2: Shimmering Crystal
- #3: Megalixir
- #4: Mega Magic Recipe
- Donald Sticker
Use Doubleflight to reach the sticker.
You receive Xehanort's Report 4 and forge a D-Link with Donald and Goofie after the cut scene.
And it's that time again! Yes, you guessed it: sticker time.
- Castle of Dreams (Palace Courtyard): High Jump.
- Dwarf Woodlands (Vault): Air Slide.
- Enchanted Dominion (Dungeon): Doubleflight + Air Slide.
- Radiant Garden (Front Doors): you might already have this one. You just need High Jump. (Aqueduct): same thing.
- Disney Town (Main Plaza): Doubleflight to reach it, (Raceway): you need to use Doubleflight then Air Slide.
Keyblade Graveyard
- #1: Elixir
- #2: Mega-Potion
- #3: Map
- Flower Sticker
Turn around when you arrive to get two chests.
- #4: Aeroga
- #5: Mega-Ether
- #6: Mega-Potion
- #7: Megalixir
The tornadoes are still in the way, but you must be used to it by now, right? There are four chests to open here.
- Bubble Sticker
- Save Point
- Moogle Shop
Tips incoming.
Ventus-VanitasTips incoming.
After the first fight, you receive a Maximum HP Bonus, and the Xehanort's Report 7 after the second one. Congratulations on finishing the game!
...
Or not?
Special Episode
Save your game and create a new save. After a cut scene, you receive the Brightcrest Keyblade. Now, go to Radiant Garden and get ready for another boss.
Tips incoming
Congratulations on finishing the game!
...
NOT!
Secret Episode
Note that you at least need to obtain Terra's last report for this to unlock. You can get it by beating Iron Prisoner II in the Mirage Arena.
Depending on the difficulty you chose, you might not have access to this episode. By following this guide on Proud or Critical, you should. If you chose Normal, please read the requirements page.
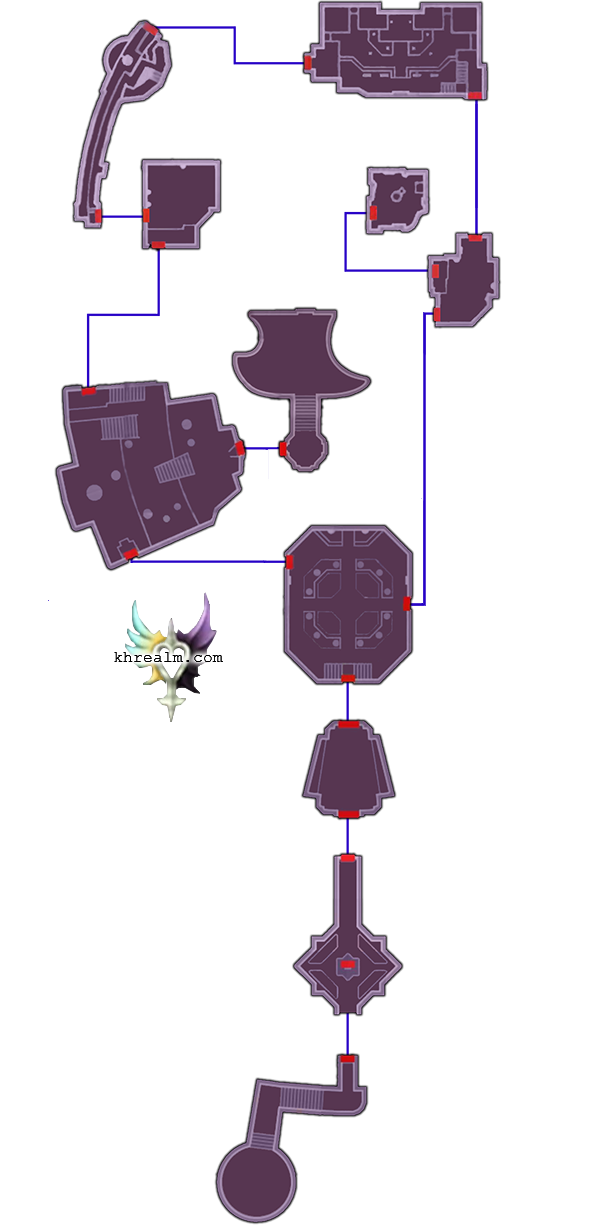
Realm of Darkness


You receive the Map of the area after a few cut scenes.
- #1: Graviga
- #3: Balloon Letter
- #2: Blackout
- #4: Chaos Crystal
- #5: Secret Gem
- #6: Transcendance
- #7: Triple Firaga
- #8: Megalixir
Tips incoming
Guess what? Now this is really the end! Except... now it's time to play A fragmentary passage. No, wait. Play Dream Drop Distance first!